31 May 2015

Thrustmaster Warthog HOTAS - Installation Troubleshooting

Thrustmaster Warthog HOTAS - Installation Troubleshooting

I had several issues installing firmware on my Thrustmaster Warthog HOTAS. The throttle would not finish installation and gave me "bulk write errors".

Steps to fix this problem:

Step 1: Uninstall Thrustmaster Target
Step 2: Uninstall Thrustmaster Warthog drivers
Step 3: Shutdown computer
Step 4: Unplug Thrustmaster Warthog from computer
Step 5: Turn on computer
Step 6: Install Thrustmaster Warthog drivers. During the installation it will ask you to plug in the Warthog Hotas to proceed
Step 7: Run Firmware updater in Thrustmaster Warthog start menu folder
Step 8: Install Thrustmaster Target

No more issues with the Warthog Hotas!

Warthog Target Files
Warthog Drivers


The Thrustmaster Hotas Warthog is the best joystick you can buy.

You will not be disappointed with its precise controls and heavy weighted joystick that matches exactly what is in the A-10C.


30 May 2015

BMW Wheel Style 158 - E90+

Great looking wheels that are excellent for Summer and Winter tires.

Specs:

Fits 3 Series E90+ and made by BBS
7 Spokes
Size is 8x17"
ET 34
5 Lug
120 mm Bolt Pattern

Individual part number: 36116775596


I ordered the BMW Cold Weather Star Spoke 158 Wheel and Tire Assembly. The tires are Bridgestone Blizzak LM-25 RFT and excellent in the snow. Assembly comes with TPMS and balanced. 

Part number for set: 36110439636

Winter wheel set can be purchased without wheel caps, tires, TPMS, and lug nuts here: BMW Genuine E90+ Style 158 17" Wheel Set

OEM valve stem caps compatible with TPMS in case you need replacements.

I applied Klasse ALL-IN-ONE Polish  and Klasse High Gloss Sealant Glaze  to protect them from the harsh winter and road salt. Klasse is made out of acrylic and lasts a very long time.
 
I highly recommend using a durable polymer wax to protect your wheels and looking great. An good alternative to Klasse is Optimum Opti-Seal.

If you are new to detailing and want to buy a kit that comes with microfiber towels and applicators, look here: The Klasse Kit.
Waxing wheels:

Style 158 wheels covered in road salt:


Check out this cool video of a: 335i xDrive with style 158s drifting

How to replace air filter on a 2015 Subaru Forester

DIY: Remove or replace the air filter on a 2015 Subaru Forester

Tools required: 
None
Screwdriver if removing intake boot (optional)

Time: 
5-10 minutes

Car: 
2015 Subaru Forester 2.5i


Steps: 
  • Open the hood.
  • Locate Air Filter Box on passenger side behind headlight.
  • Remove two metal clips holding two halves of air filter box together. Clips are circled in red below. 
  • Push the rear half of air box backwards and remove dirty air filter. 
    • If there is not enough space to remove the old filter, consider removing the rear half. Loosen and remove the clamp circled below in blue and pull the intake hose backwards. Un-clip the MAF sensor wire bundle and remove the rear half.
 
  •  Dirty OEM air filter below. 
  • I replaced the old filter with a MAHLE Air Filter. The Mahle filter has more pleats for better filtration and performance. Look at the picture below to see the difference. 
  Installation:
  • Install new filter with the pleats facing the headlights and flat side facing passenger. If there is excessive dirt and grime, clean the area with soapy water or a degreaser. 
  • Push rear half to forward half until they fit and re-attach two metal clips. 
    • If you removed the rear half, attach the rear half and MAF wiring bundle. Connect intake hose to rear half and reattach clamp. 
  • That's it! 
Start the car and check for major air leaks around the air box halves and intake hose.

Notes: 
Check your air filter at least every other oil change. Air filters typically need to be replaced 10,000 - 15,000 miles depending on driving habits and air quality.

A clean air filter will improve gas mileage and power. Do not let a dirty air filter punish you at the fuel pump.

25 May 2015

DIY: Front Sway Bar, Bushings, and Links for QX4 and Pathfinder R50

Steps:
  • Remove eight 10mm bolts holding plastic splash guard. There may be less because the bolts tend to fall out, I only have six.

  • Remove four 14mm bolts on each front sway bar mounts.
 
  • To remove front sway bar:
    • Jack vehicle and place jack stands under the front of the vehicle
    • Remove both front wheels
    • Disconnect bottom nuts on both front sway links. Pulling on the sway bar and extending the sway links forward will provide better access to the nuts. 
    • The sway link nuts are 19mm. Use a wrench on the back nuts to hold it in place while loosening the nut facing you. 

       
  • To install front sway bar: 
    • Install sway links on each side of sway bar. 
    • Install sway bushings.
    • Install sway mounts.
    • Install front splash guard.
    • Install front wheels
I used ADDCO Front Performance Anti-Sway Bar over OEM.

  • To remove & replace front sway links. 
    • Remove splash guard and mounts
    • Remove top and bottom 19mm nuts on both sides of the front sway link.
    • The top nuts are connected to the strut and the bottom nuts are connected to the sway bar. 
    • The picture below illustrates the old OEM front sway link.
  •  To install:
    • Install top sway link nuts to the strut
    • Install bottom sway links nuts to the sway bar
    • Install sway bushings
    • Install mounts
    • Install front splash shield
    • Install front wheels 
It may be difficult to install the sway links so try installing the bottom nuts first, or installing the sway bar before the sway links. I would tighten and torque the links down after the sway bar and mounts are installed.

I purchased Moog Sway Bar Link because there are Zerk fittings so I can grease the bushings. Nissan OEM Sway Links do not have grease-able Zerk fittings.

It is time to change sway links where there is clunking and rattling going over bumps. Sway links will need to be replaced if there is slack when pulling on them. Another symptom is excessive lean or body roll in corners.

The nuts and bolts are most likely seized if not recently removed. Soak them with PB Blaster Penetrating Catalyst or another penetrating oil to aid in removal.

Below is a diagram from the service manual that has torque figures. 


DIY: Lubricate Propeller Shaft on Infiniti QX4 & Nissan Pathfinder

How to Lubricate Propeller Shaft on Infiniti QX4 and Nissan Pathfinder R50

The owner's manual recommends greasing and lubricating the propeller shaft every oil change.
  • Crawl underneath the QX4 or Pathfinder and find the propeller shaft between the exhaust pipe and automatic transmission pan.
  • Locate the Zerk fitting which is circled in the picture below. The fitting sticks out of shaft and may be difficult to access if pointing upwards. Drive a few inches front or back until propeller shaft rotates and the Zerk fitting points downward. 

  • Give the grease gun a few pumps. Do not excessively pump so grease leaks out of the shaft, you do not want to blow the seals.
Note:  The propeller shaft is known as the drive shaft everywhere else in the world. Japan calls it the propeller shaft.

I am willing to bet greasing the propeller shaft is often missed at quick lube shops and the dealership. This is a quick less than 5 minute job, take the time to do some preventative maintenance.

If there is drive train vibration and noise, greasing the propeller shaft may help.

This video is extremely helpful. 2001 Infiniti QX4 Propeller Zerk Fitting

24 May 2015

DIY: Infiniti QX4 & Nissan Pathfinder Oil Change

How to change engine oil and filter on the Infiniti QX4 and Nissan Pathfinder R50

  • Loosen oil filler cap in engine bay.
  • Remove plastic splash guard underneath the front of the QX4. The splash guard is held by eight 10mm bolts. There may be more than eight as they tend to fall out over time.
  • Locate oil filter. View picture below for reference. 
  • Move oil drain pan underneath engine oil pan. Loosen and remove oil drain plug and let the oil drain. Be careful to not damage the pan when loosening drain plug and the oil may be very hot if the car has not cooled down. The drain plug is highlighted in orange.
  • Pop open the hood and remove the oil fill cap.
  • Replace the engine oil cap when done.
  • Drive the car around and check for oil leaks around the filter or drain plug. Reinstall the splash shield when done.  
  • Check dipstick to see oil is within limits.
Notes:
Changing the engine oil and filter is very easy. You can save money by changing the oil yourself and make sure everything is done properly. You never know if the quick lube places are doing things correctly.

Dispose old oil at parts store or local landfill.

The owner's manual says to fill with conventional motor oil only, synthetic motor oil may cause leaks. I filled the QX4 with conventional oil and have had zero issues over the many years and miles. I certainly have not babied or kept the Q as a garage queen, just kept up with regular maintenance and oil changes and nothing engine or mechanical has needed fixing. Do not put non recommended synthetic oil into your QX4 or Pathfinder, you will be throwing money away and potentially cause damage.

23 May 2015

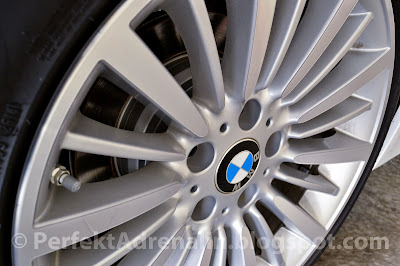
BMW Wheel Style 416 - F30 3 Series

BMW Wheel Style 416

F30 3 Series Luxury Line Wheel
18" Size 8x18 245/45/18 front and rear
Part # 36116796249


I really like the look of the style 416 wheels. When I first viewed them in pictures, I thought the wheel was too busy looking and boring. My perspective has changed after seeing these 18" wheel in person and they are great for the 3 Series luxury line.

Cleaning these wheels will take time with all the spokes and very small spaces. I recommend using a thin wheel brush kit and dedicated soft microfiber towel to get all the spokes clean.

I recommend using ABN Woolies Wheel Brushes Kit to clean the tight spaces between the spokes.