Showing posts with label BMW. Show all posts

04 May 2020

Bolt Extractor to Remove Stripped Transmission Support Bolt on BMW E39

I broke a support brace bolt, while replacing my old transmission mounts on the E39. The bolt was broken at the head, and the threaded shank was left in the hole. I heard it snap and felt sick to my stomach. It was the last bolt to be removed to the brace and I didn't know what to do.

I looked online and apparently, breaking transmission support brace bolts is common. They are exposed to road salt, and get rusted out. Drive train components last for years before maintenance, so these bolts don't get taken out often.

The solution:
  • Extract the broken bolt with a screw extractor. 
  • If extraction doesn't work, drill it out. 
  • Rethread with tap and die, if female threads are stripped
  • Helicoil, if cutting threads doesn't work with tap and die

Broken bolt and stuck screw
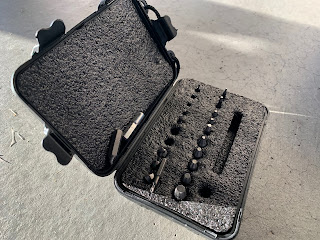
I purchased the Werkzeug damaged and stripped screw extractor set and a  a Gearwrench Ratcheting Tap and Die set as well. There are 22 pieces and it comes with an magnetic extension bit holder and socket adapter.


I placed the bit holder in my drill, and picked the smallest driller. I started drilling, and had some difficulty establishing a clean hole to use the bit. I lowered the drill speed and alternated between driller sizes. I was really skeptical at first, because the bits are so small. I questioned myself, if I was doing this right at all, and if this would even work. I pressed on, out of desperation.

After 25 minutes of drilling, I finally got a good clean hole and put in the extractor. I pressed the trigger and could see the screw turning a little but it stopped. So more drilling, with a larger driller. I stepped up the extractor to #6 and the broken screw finally came out. I was elated and so happy.


Broken screw with extractor tool

Broken screw removed
I cleaned up the threads with a tap and die, removed and replaced the old transmission mounts, and put in a new support bolt into the brace.

The $20 extractor kit saved me a trip to the shop. Every do-it-yourself mechanic needs to have one of these. It is such a lifesaver, especially in tight spots where cutting the bolt is not feasible.
17 November 2018

Low MPG on E39 530i. DISA Valve?

I am getting around 15 - 16 mpg on my E39 530i with almost all city driving. Fuel economy has dropped almost 3 MPG over the last few months.

I noticed the car is running rich, with a heavy gas smell on start up. No check engine lights are on, so I am wondering if it's the DISA valve.

I swapped out the old DISA valve with an off-brand bought on Amazon. The build quality is similar to OEM, and the price almost identical to rebuild kits. I will report on the new DISA, as time goes on. Hopefully, my low MPGs are resolved.

I could tell an immediate improvement and idle. It also seemed like the 530i has more power, and isn't downshifting as much.

I figured my DISA was failing due to the rattling noise around 3500 rpm. I took removed the old DISA and there were no missing or broken parts, and the seal looked fine. I changed it out anyways.

Here are the things I have changed, that could change MPGs:
  • OEM spark plugs
  • Brand new valve cover gasket and seal
  • Air filter
  • VANOS seals
  • Pre-Cat 02 sensors
  • Intake and Exhaust VANOS sensors
  • Pulleys, tensioners, and accessory belts
  • Cleaned MAF, throttle body, and ICV
  • Fuel Filter
  • Oil changed every 5,000 miles
  • Upper and lower intake boots
  • All vacuum lines 
The other items that need to be changed:
  • CCV
  • Post Cat sensors
  • Throttle body gasket
  • Coils
  • MAF
  • Injectors and o-rings
  • Intake manifold gaskets
I can't think of anything else. Does the fuel pump affect MPG?

13 April 2018

BMW E90/92 Brake Job Must Read

If you change your BMW brake pads and/or rotors, you must change both wear sensors at the same time. The BMW will trigger a brake wear warning if you only replace one sensor. I learned this the hard way.

I replaced my rear rotors and brake pads with Zimmerman Z-Coat and StopTech. For the brake sensor, I used a non-OEM brand named Bowa. Huge mistake. The Bowa sensors are one-third the price of OEM sensors for a reason. They have almost no shielding for the wire that plugs into the brake pads that rubs against your suspension causing breaks and fraying. I cannot recommend buying OEM brake sensors enough because the entire wire is protected. 

I'm certain that changing the rear brake sensor only tripped the warning light, but lets say I changed both sensors at one time. The light still would have triggered because the Bowa wires were frayed after a couple of drives. 

Please save yourself the headache and change all brake pads, rotors, and sensors at once and do a reset. It will save you the time of taking everything apart again.

Apparently the BMW computer measures the wear at both sensors at the same time. If one changes but the other is the same it triggers the brake warning light. 

18 March 2018

BMW B58 Lifespan?

The BMW B58 engine has a heat management system which encapsulates heat for up to 36 hours. My question is does this system reduce engine and cooling component life compared to the N55? It's too soon to tell but I want to know if faster warm up and better emissions means shorter engine lifespan.

30 December 2017

E90 Electric Fan Removal and Installation Tips

I've seen posts that say removing the E90 electric fan and fan shroud is super easy and others that took several hours.

For me, it was a huge hassle because of the rubber piece that is attached to the pipe after the intercooler. The electric fan would not come out no matter how hard I pulled. Removing the two torx bolts and the plastic clip above the rubber piece were super easy but I got stuck after that.

I circled the rubber piece in orange below. It is located on the driver side of the electric fan.


Here is how I finally got the plastic clip loose and fan free:

  • I got a very long flat head screwdriver
  • Placed screwdriver between rubber and plastic clip on intercooler pipe. 
  • Pushed and pried plastic clip off rubber piece. It may help to get one side of the clip loose first and then pry from the center. 
Installing the fan did not go smoothly as well. I kept getting snapped on the plastic part of the brace which I circled below. 


Some other things to be aware of:
  • Be careful to not snag or pinch wiring or fan controller underneath brace
  • Pull coolant hose towards engine as you are lowing electric fan
  • The plastic clip on the intercooler pipe was causing issues for me and bent the rubber piece. I used the screwdriver as a guide and straighten the rubber piece. 
  • It helps a lot to have another person on removal and installation since the clearance is so tight. 
Removing the cooling fan and shroud will make life a lot easier in removing and replacing the tensioner, pulleys, and belt. I strongly suggest using the Continental belt. 

E39 Trunk Release Button Does Not Work

My E39 trunk button would not work but the key fob would unlock the trunk. This is because the lock on the trunk is in Valet mode. To get out of valet mode, stick your key into the trunk lock and make sure you it's in the vertical position.

I thought this was an electronic issue at first and didn't think much of it. Just a slight annoyance that I had to use the key fob to unlock the trunk. I figured it would be very expensive to fix so I didn't mind. This became an issue when I had to turn of the car and use the key fob for the trunk. I looked online and found other owners having this issue.

09 December 2017

E39 Ignition Switch Removal Tips

BMW E39 5 Series Ignition Switch Removal Tips

There are multitudes of tutorials on how to remove and replace ignition switch on E39s. Here are useful tips I learned that were not pointed out or emphasized enough in those DIYs.
  • Push in the clips on top clam shell cover nearest steering wheel while pulling down on lower clam shell to gain access to switch. Be very careful as the plastic clips are fragile. This took me longer than expected until I found where to push in. 
  • Remove lower clam shell all the way by using needle nose pliers to push in two side and three bottom tabs. 
    • This will greatly help in using screwdriver to back out screws holding in switch
  • Remove wood trim pieces on left and right side of steering wheel using plastic pry tools. Then use Phillips screwdriver to remove screws and lower dash. 
    • Absolutely necessary for access to top T27 torx bolt. 
  • Use a 1/4 inch ratchet and the smallest T27 Torx socket for top torx bolt. 
    • Space is extremely tight. I used needle nose pliers to loosen and tighten torx bolt because my ratchet was pressed against the dash while removing the torx bolt. 
    • Other tutorials say the bolt is T30 however mine was T27. 
  • A E39/E38 Steering column vibration mount (PN 1093829 or 32311093829) was in lower clam shell upon removal. I don't know how to put it back and left it out with no noticeable difference in driving. 
  • You must use flat head screwdriver to position white plastic part inside new switch to where old switch was positioned. Otherwise your new switch will not work. It looks like a T carved into white plastic. 

My bad ignition switch symptoms:
I changed my engine mounts and the airbag light came on. It was intermittent and would flash on and off with strange clunking noises coming from the steering wheel. I lost all steering wheel controls and my radio would stay off after I shut off the 530i. The lower portion of the radio LCD would not illuminate and it would take me several minutes of pushing the volume knob to turn off the radio. 

I figured the switch was faulty by using the passenger and driver side vanity mirror test. All radio electronics would shut off by sliding the vanity mirror cover and the airbag light went off. 

Luckily it was a bad switch and not a clock spring or slip ring. This job is simple but can be annoying due to the tight fit of everything, especially the top T27 bolt. I estimate this will take 1-2 hours to replace. 

I noticed my LCD displays are much brighter with the new switch. Looking back that was probably the only warning that my switch was going out.

03 December 2017

E39 Engine/Motor Mounts Helpful Info

There are many tutorials on how to replace engine mounts for E39s but here are some useful tips that they are missing or did not emphasize enough. This job is simple and can be done relatively quickly with my tips below.

Tips: 
  • My driver side mount required a 21 mm socket for the top cover
  • Universal sockets or adapter is required due to the angle of the nuts
  • Raise the car onto four jack stands or ramps. I made the mistake of only lifting the front and it was impossible to remove the mounts
  • Other tutorials say jack engine one or two inches. That is not enough to remove passenger side engine mount. You must remove engine fan using 32 mm wrench and holding tool to lift engine. Otherwise the fan will bump into fan shroud and crack
  • I highly recommend using two people when lowering engine. One person lowers car jack while other person ensures engine mount studs go through mounting holes
  • Penetrating oil on the nuts, especially if mounts have never been replaced before
  • Motor mounts are a good preventative maintenance item on E39s and E46s because if they fail the engine fan could hit the shroud and explode, destroying your coolant lines. 
  • Use a deep 16 mm socket for the nuts. 
Go with Lemforder engine mounts, they are OEM for BMW. Other brand engine mounts are much cheaper but will not last long. 

There is a big difference in ride quality and idle smoothness after changing my engine mounts. No more harsh idle or front swaying in corners.

I don't know if it's a coincidence or changing my mounts caused my airbag light to go on and steering wheel radio controls to stop working. When I turn off the car the radio keeps playing. 

06 August 2017

E39 Windshield Spray Nozzle - Needs Adjustment

You must adjust the BMW windshield spray nozzle on an E39 after installing. Otherwise it will spray over your windshield.

To adjust, I suggest using plastic picks to carefully aim the nozzles downward. It's okay if aiming is incorrect, you can always adjust. Aiming requires some patience as I have noticed it's difficult to break tension but very easy to over-adjust and aim too low.

Please be careful using metal picks or needles, it's really easy to damage the E39's nozzles.

I replaced my spray nozzles because the intensive cleaning hose was cracked, The hose was extremely hard and difficult to remove from the spray nozzle and I ended up breaking the male adapter.

Intensive Windshield Washer Nozzle is part # 61668361042
Regular Windshield Washer Nozzle is part # 61668361039

Intensive washer hose is part # 61608364209
Regular washer hose is part # 61608364200

18 May 2017

EMP Stewart Water Pump

Comparison of EMP Stewart water pump and OEM on E39 530i.

The EMP Stewart water pump is a high performance all metal pump that comes with lifetime warranty. They claim 20% increased water flow over OEM which works well with larger pulleys for maximum performance.

I have been using the EMP Stewart water pump for over 10K miles and hope to get many more miles. It's not cheap at $175 - $195, but the benefits outweigh the costs.

Used on my M54B30 engine and will fit any related engines.

High quality construction and looks great
Beefier than OEM and larger impeller
Installation is the same as OEM. I highly suggest buying an aftermarket aluminum pulley instead of using the OEM plastic one. Since you have removed everything to get to the water pump, replace the pulley to prevent it from cracking over time.

This pump is a E36 M3 favorite with lower drag and more efficient cooling. Many E36 M3 drivers in my BMWCCA club swear by this pump on their tracking days.

07 January 2017

Zimmerman Z-Coated Rear Rotor on E39 530i

Zimmerman Z-Coated rear rotor and StopTech street performance brake pads on a BMW E39 530i. H&R sport springs and Bilstein sport shocks shown as well.


Braking performance is amazing and I love this setup. Only downside is the amount of dust the StopTech brake pads generate.

06 January 2017

Aftermarket Cup Holder Replacement for BMW E39 5 Series

This DIY applies to all E39 5 Series 97-03.

OEM cup holders are notorious for breaking because they are extremely flimsy and there aren't any other cup holder locations. If you are lucky, the cup holder will break while open so there is access to the Phillips screws. If the cup holder is broken while closed and you cannot open then removal of the audio and climate controls may be necessary. A small flat head screwdriver may be used to pry open the flanges from the side to access the screws.

Luckily there are aftermarket options that are durable and cheap. The only downsides are they take up the tray area because there aren't flanges and accessibility to the climate control may be difficult with drinks.

I went with the FGT Motorsport E39 Front Cup Holder Upgrade which has been working great. Every aftermarket cup holder looks exactly the same and another good one is the TrunkNets E39 Premium Front Cup Holder.

I have added pictures below of what the aftermarket cup holders look like and how they attach to the tray.


If the flanges are open:
Locate screws on cup holder and remove using Phillips screwdriver.


Cup holder removed to reveal cheap flimsy plastic parts.


Cup holder removed.


Remove tape cover and attach aftermarket cup holder to tray. 


Done! Enjoy your drinks without having to holding them in between your legs. The FGT cup holders are very sturdy and I can fit large drinks in them. No more annoyance looking down at seeing broken flanges, they are replaced with a clean and classy aftermarket mod.

10 December 2016

Nokian Hakkapeliitta R2 Winter Tires on a BMW E39 530i

I run a set of BFGoodrich g-Force Comp-2 all season tires on my E39 530i. BFGoodrich's Youtube video states that they will do fine in the snow and many tire review websites give a 5/10 rating for winter driving. I thought they would be good enough for light snow and I was completely wrong.

The g-Force Comp-2s are terrible once snow starts sticking to the pavement and there is hardly enough traction to drive without fishtailing. It is downright scary going up and down hills or turning and braking in just a couple of inches of snow. They feel more like a Summer tire than All-season in the Winter.

I looked online and decided to get Blizzak WS80 or Michelin X-Ice Xi3 tires, depending on which store had them in stock. I was not able to find any of these tires and needed to special order them. Luckily I found a local tire dealer had 4 Nokian Hakkapeliitta R2 tires in inventory which I scooped up immediately and got them mounted.

The difference in snow and ice is incredible. I haven't had any traction problems and the 530i feel so planted with no noticeable slippage. I am no longer apprehensive about going on curved highway on-ramps that are glistening with ice because of the aggressive Hakkapeliitta tread design.

Aggressive tread pattern
I have Blizzaks on my other cars and I definitely believe the Hakkapeliittas offer better traction and handling in deep snow and ice.

Sidewall grooves to bite into snow
There is no noticeable road noise and the ride is very smooth compared to the BFG g-Force tires. Going over potholes is a lot less dramatic and everyday driving is easy because of the very low rolling resistance of the tires.

I love the look of the Hakkapeliitta R2
There are a few downsides to the Nokian tires. Braking distance is longer than with the BFGs and handling feels very mushy and floaty on dry pavement, especially when the temperatures rise above 45 degrees Fahrenheit. While the Hakkapeliitta R2's are amazing in the snow, I get a lot more slippage and wheel spin when the roads are dry and the car feels like it is driving in mud. These are small complaints and trade-offs for the best winter tires on the market.

I highly recommend these tires and I would suggest anyone to buy a set of Nokian Hakkapeliitta R2s. The price is very close to Michelin X-Ice or Blizzak tires but the deep snow performance is unrivaled. I imagine a BMW with xDrive or LSD would be nearly unstoppable with Nokian tires. 

I searched Nokian winter tires for E39s and didn't see much information on various BMW forums so I am writing this post. I hope this helps! 

22 October 2016

How to Remove & Replace E39 5 Series Windshield Wiper Relay

DIY: BMW E39 01+ 5 Series Windshield Wiper Relay

If the windshield wipers do not work or start acting weird on your 5 Series, the simplest thing you can check or change is the Windshield Wiper Relay/Switch. The relay is located under the passenger side microfilter box and easy to get to.

This DIY applies to all E39 5 Series made after 2001. I believe the procedure is the same for earlier E39 models but the relay(s) are different.

Tools: 

  • 6mm hex bit socket and ratchet
  • Extension (Optional)
  • Dielectric Grease (Optional)
  • Flat head screwdriver 
Parts: 
Steps: 
  • Remove passenger side microfilter box.
Driver side box is pictured. Remove the Passenger side box.
    • Use a flat head screwdriver and push down on plastic tabs to disconnect air duct. (Red)
    • Unclip metal latch holding air filter cover. (Purple)
    • Remove air filter tray cover. (Yellow)
    • Remove cabin micro filter. 
    • Remove rubber trim/weather stripping around cabin filter tray. 
    • Squeeze and remove metal clip from screw holding tray to body of vehicle. (Blue)
    • Lift and remove cabin air tray. 
  • Remove relay box cover.
    • Remove four bolts (green) using 6mm hex bit socket and ratchet.
    • Remove relay box cover
      • There are two small plastic tabs/clips on the back of the cover that attaches to the relay box. Gently work the cover until it comes free, if the plastic is so brittle the clips may break which is okay since the cover is held by the other four bolts. 
  • Remove and replace old relay.
    • Relay location is circled in red.
    • Simply pull out and insert the relay. There is only one way the relay can be inserted and is dummy proof. 
    • Optional: Apply dielectric grease  to the relay pins to prevent corrosion or water damage. 

  • Check and see if windshield wipers are operating correctly. 
  • Re-installation is the opposite of removal steps. 
    • Re-attach relay box cover.
    • Install four 6mm hex bolts. 
    • Reinstall microfilter box with rubber trim, clips, and reattach air tube.
Notes:

The relay box also contains the fuel injector, DME, Auxiliary Fan, Air Pump, ABS, and Auxiliary Fan Stage 3 relays. This DIY has the exact same steps if you need to access these relays and fuses. 

If the windshield wipers are still not operational or acting funny, it may be the wiper switch on the driving column, wiper assembly, or wiper motor that is not working. The relay is the easiest and cheapest thing to check first.

Make sure relay box cover is snug and there are no cracks so there is no water coming into the relay box.

If you don't want to spend money on a new relay, you can try cleaning the relay contacts and see if the windshield wipers work. 

09 October 2016

BMW Shadowline Trim Paint Code

The paint code is 668 (Jet Black) for BMW Shadowline trim pieces.

My dealership refused to replace my Shadowline trim pieces even though the paint was starting to come off and the car is still under warranty. They advised me to pick up some touch up paint and cover the entire shadowline window trim.

Part # 51910419746 for the touch up paint with clearcoat.

05 September 2016

StopTech Street Performance Pads & Zimmerman Rotors

I swapped out the old, cracked, warped OEM rotors and Akebono Ceramic brake pads on my 2002 BMW E39 530i and installed StopTech Street Performance pads with Zimmerman coated rotors. How do I know the previous owner had Akebono pads installed? I have some extra unused pads and the part numbers match up and they look identical. There is still plenty of life left on the Akebono pads but I want something more aggressive so I went with StopTech.

Let me tell you how great the braking now feels. No more annoying shimmy or vibrations during braking, especially on off-ramps or coming down from the canyons, just nice solid brake application.

I bought my 530i used and I believe the rear rotors are original and pads are Akebono so I can't tell you how the initial bite feels compared to OEM Jurid pads. All I can say is the speed sheds quickly and the bite is pretty strong. Performance is awesome and confidence inspiring in spirited driving, I haven't had any fading or sketchy issues and I believe the DOT4 fluid helps a lot. The response is such a night and day difference that I have never felt before in this car.

Another great benefit of the Zimmerman zinc coated rotors is the way they look through the wheels, no more ugly rust that screams for attention. It is unfortunate to see a perfectly detailed car with rusted hubs.

I highly recommend this combo for daily driving, light track duty, and canyon driving. If you are looking for low dust and no noise, I would suggest going with the Akebono Ceramic brake pads with Zimmerman rotors. I did consider getting Hawk pads but that would have been overkill. Let me know what brake/rotor combos have worked well for you and leave a comment below.

1 month update: 
The StopTech pads dust a lot, if I don't wash my car every week the wheels are almost black. Performance is still amazing with whiplash inducing force if I slam on the brakes. These pads inspire a lot of confidence in driving and I can't recommend them enough.

No wonder why I was getting vibrations and squeaking noises, the rotors are all scored and have cracks.
Zimmerman rotors looking good with Bilstein Sports.
Zimmerman Rotor packaging.

06 August 2016

BMW E39 530i Front End Shimmy

When I bought and first drove my 530i, I noticed a severe steering wheel shimmy around 45-55 mph, 75 mph, and during braking.

I ruled out warped rotors as the primary cause since the worst vibrations occurred during driving. I decided it was one or all of the front arms or unbalanced wheels causing shudder. I highly doubted the previous owner performed any preventative maintenance and I was right, all the suspension pieces were original and have never been changed out.

I switched out the old lower front control arms with Lemforder arms and a large majority of the shimmy went away. The really bad 45-55 mph wobble was gone but the higher speed vibrations remained. After switching out the thrust arms all shimmies are gone and the 530i drives great.

22 July 2016

H&R Sport Springs and Bilstein Sport Shocks on my E39 530i

I recently upgraded my OEM shocks and springs on my E39 530i to H&R Sport Springs (29742-1) and Bilstein Sport Shocks. The front control arms, front and rear sway links were also replaced with Lemforder parts.

My first impressions is how bumpy, firm and extremely stiff the 530i now handles. I knew the ride was going to be more harsh, but I did not expect it to be so bouncy and bone shattering. Going over large bumps and dips is like going on a roller coaster, you feel front end dive and then recoil hard. Watching the rear view mirror shimmy and shake while driving is something new.

Not all is unpleasant with the H&R and Bilstein upgrade. The car feels planted and confidence inspiring on the highways and smooth roads. Turning into corners and canyon driving is a blast and this is where the sporty setup shines. I can take corners with much more stability and poise than ever before.

So is it worth going from OEM to H&R and Bilstein sports? I say yes. The setup is much cheaper than replacing with OEM parts and looks even more sporty. All the annoyances go away once you turn into a corner. Another benefit is how flat and stable the 530i feels under braking and accelerating, no more dipping and diving at stop lights.

If comfort is you are looking for, then go for OEM.

Update 1: I love the way sporty and conservative look with the springs. Time for some bigger wheels to fill the wheel well.

After driving a couple of hundred miles, I would say the ride is less jarring than run flats. I still find it funny during braking and feeling the car rock back and forth because the ride is so stiff.


Update 2: 10 months later and the ride is still very firm but a dream on the highway. Going into bends at 80 mph or attacking interchanges and hairpins is where the Bilsteins and H&R combo really shines. It feels so effortless and confidence inspiring on the highway.

Driving on city streets is still jarring but it has gotten better. I wouldn't say my ride is ruined like I read on the E39 forums but its still very bumpy.

30 June 2016

DIY: Brake Fluid Flush on BMW E39 5 Series

How to change brake fluid on a BMW E39 5-Series using the Motive European Power Brake Bleeder w/ Adapter


BMW recommends flushing brake fluid every two years for everyday street driving.

Tools: 
Parts:
Recommended:
  • Shop rags or towels to place around brake reservoir and underneath brake caliper for spills.
Steps:
  • Break torque on wheel lugs using 17 mm socket and ratchet
  • Safely jack up E39 and place on jack stands.
  • Remove lug nuts and wheels. 
  • Pop open hood and locate driver side cabin air filter tray.
  • Use a flat head screw driver and push down on the plastic tabs to disconnect air duct. (Red)
  • Unclip metal latch holding air filter cover. (Purple)
  • Remove air filter tray cover. (Yellow)
  • Remove cabin micro filter. 
  • Remove rubber trim around cabin filter tray. 
  • Disconnect electrical plug from hood sensor. (Green)
  • Squeeze and remove metal clip from screw holding tray to body of vehicle. (Blue)
  • Lift and remove cabin air tray.
  • Now you have access to the brake fluid reservoir.
  • Open reservoir cap (red circle) and suck out old brake fluid with a turkey baster. 
    • Place rags or towels around reservoir to soak up spills. Brake fluid will damage and remove paint. 
  • Fill brake reservoir to max with new DOT 4 brake fluid. 
  • Dump remaining brake fluid into Motive brake bleeder. 
  • Install adapter to brake fluid reservoir.
  • Pump brake bleeder to 15 psi.
  • Go to right rear brake caliper and locate the brake bleeder nipple. 
    • Now is a good time to inspect brake lines for any wear, rot, or damage. 

  • Remove cover from bleed screw and attach hose from bleeder bottle. 
    • If using 9 mm box end wrench, place it on bleed screw before attaching hose from bleeder bottle.
    • I sprayed penetrating oil on the screws for ease of loosening. 
  • Loosen bleed screw and wait until all the air bubbles and dirty brake fluid has left the hose.
    • Look for new, clear brake fluid before tightening bleed screw. 

  • Remove hose and reinstall cover. 
  • Pump Motive power bleeder to 15 psi.
  • Repeat the process for the left rear caliper, right front caliper and finally the left front caliper.
    • Make sure power bleeder is at 15 psi before each bleed. 
  • When completed, remove pressure from the power bleeder side and fill reservoir to max. 
  • Reinstall reservoir cap.
  • Reinstall cabin micro filter tray and rubber trim piece. 
  • Reinstall and torque wheels.
  • Jack and remove jack stands to lower E39. 
  • Test the brakes by moving a few feet before going on a drive. 
Notes:
Buy two 1-Liter bottles of brake fluid. One should be enough, but you want to have an extra liter in case of spills or shortage of fluid.

Gently loosen and tighten the brake bleed screws, it is easy to strip and damage them.

It is normal to have air bubbles in the hose from the power bleeder to the reservoir during fluid flush process.

Cover all areas where brake fluid may spill. Brake fluid will strip paint.

Minimize the amount of time new brake fluid will be exposed to air. Brake fluid is hygroscopic so remove the reservoir cap only when necessary. Properly dispose of any opened brake fluid bottles if not using in the near future.

This tutorial may apply to other BMW models.

I don't think the previous owner ever changed the brake fluid or within the past five years. The old brake fluid was extremely nasty and almost black.


22 May 2016

How to Replace Fan Clutch & Cooling Fan on a BMW E39 5 Series

DIY: BMW E39 5 Series Fan Clutch and Blades


Why:

A failing fan clutch can cause overheating conditions and catastrophic engine damage if ignored. Over time the viscous fluid has leaked or dried up causing the clutch to seize. Other conditions such as bearing failure can cause too much play and not enough drag. You can test clutch friction by spinning the fan blades when the car is turned off. If you are able to freewheel and spin the fan without any tension the fan clutch is bad. Other symptoms aside from overheating include rumbling, rattling, or scraping noises and weak air flow.

To make a potentially bad situation worse, the plastic fan blades become brittle and fragile over time. Cracks may develop or blades start to disintegrate causing the fan to shatter sending fragments into the radiator, pulleys, belts, hood, power steering reservoir and hoses. A bad water pump bearing or pulley may also send the fan into the radiator causing it to explode. 

To prevent these damages from occurring, proactively replace the clutch fan and blades when overhauling the cooling system between 60K - 90K miles or immediately when symptoms arise. 

This DIY is specific to inline-6 E39s and may apply to E46s. The steps are similar to V8 E39s, the difference is the fan shroud does not need to be removed on M5s or the 540i.

Tools:
  • Flat head screwdriver or plastic body panel removing tool
  • Phillips screwdriver (to remove expansion tank bleed screw)
Taken from Bentley Publishers E39 manual.
Parts: 

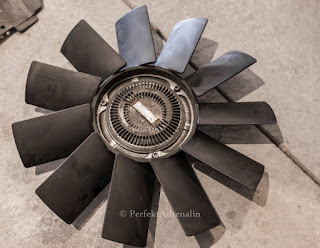
  • Fan blades Part # 11521712058. 
    • I bought the MTC fan and I wish I read other driver's comments before the purchase. MTC fan blades are built in China and have reported to crack in a year. Stick with OEM or Febi fan blades. 
  • Fan Clutch Part # 11527505302.
  • Three screws attaching fan to clutch
    • Optional if original screws are in good condition
    • Part # 07129905536
Recommended:
  • Anti-seize
    • Removing fan clutch in the future much easier. 
  • Fan shroud rivets Part # 1711712963 
    • In case you lose or damage them removing fan shroud.
  • Penetrating oil
  • Expansion tank cap seal Part # 17111723580
    • In case of damage while removing. 
Steps: 
  • Pop open or remove rivets on both sides of fan shroud. Circled in red below. 
Driver side rivet.
Passenger/Expansion tank side.
  • Use Phillips screw driver and remove bleed screw on expansion tank. Blue dot in picture below.
  • Use flat tip screwdriver or fingers and remove expansion tank cap seal. Red dots in picture below.
    • Squeeze two plastic tabs together and pull seal out.
  • Push expansion tank backwards out from fan shroud. 
  • Reinstall bleed screw.
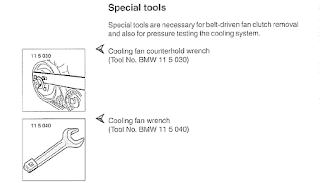
  • Place fan clutch holding tool on two water pump pulley bolts.
    • Use the appropriate side of the holding tool depending on which two pulley bolts are easiest to get to. 
  • Place 32 mm wrench on clutch fan nut to remove clutch. 
    • Turn wrench clockwise while holding counterholding tool on pulley bolts to loosen fan clutch nut.
      • Nut may be very hard to remove so use PB blaster or other penetrating oil on the nut. Be careful not to spill any oil onto the belts. 
      • A lot of force may be necessary to loosen the nut. 
      • Remove air intake box to get better access to water pump bolts with counter hold tool.
      • If you are overhauling cooling system or changing the thermostat, removing the radiator to thermostat hose will help greatly in getting access to the water pump pulley bolts. 
    • I was not able to get good pictures of the clutch nut so I scanned and added Bentley manual pages below.


  • One the nut is loose, spin fan blades clockwise until clutch is off water pump threads. 
  • Carefully hold fan and raise fan shroud.
    • Other DIYs and manuals say to remove cooling hoses from the bottom and side of the fan shroud. I did not do this because I only raised the fan shroud a few inches to slide the fan and clutch out. Just be careful not to damage any of the hoses if you don't remove them. 
  • Slide blades and clutch fan up and away from shroud. 
My original fan coated in grime. 
  • Remove three screws holding blades to clutch. Red dots on picture below. 
    • They are 5 mm Allen/Hex screws. They have a lot of grime and may be difficult to remove. Penetrating oil will help greatly. Be careful not to strip the bolts. Part # 07129905536 if they are missing or damaged. 
  • Place new fan on new clutch. Ensure blades are going the right direction and not installed backwards.
  • Install three 5 mm Hex screws to attach fan to clutch. 
    • Use new screws if original are in bad condition
I bought MTC fan blades. Do not make the same mistake.
  • Carefully raise fan shroud and insert fan into shroud. 
  • Screw fan clutch nut over water pump threads. Spin fan counter-clockwise to tighten nut. This may require some time and patience.
    • Add anti-seize to pulley threads for easier removal in the future. 
  • Tighten clutch nut onto water pump. Torque figures are in the picture below. 

Installed!
Bentley manual torque figures.
  • Remove bleed screw and push expansion tank back into fan shroud.
  • Reinstall expansion tank seal.
  • Reinstall bleed screw.
  • Ensure fan shroud is correctly seated.
    • Reinstall any cooling hoses if they were removed. 
  • Pop in or reinstall two rivets on each side of fan shroud.
  • Start E39 and observe fan clutch operation. 
    • There should be much more air flowing through the fan and no growling or rumbling noises. Do not put your hands or fingers in fan!  
Notes:

V8 equipped E39s do not need to remove fan shroud to access fan clutch nut.

Do not put your hands or fingers in the fan while the car is running. I would not try the newspaper test because the fan blades can be brittle and may shatter when inserting the newspaper. Test clutch friction and tension by trying to spin the blades while the car is off or replace the unit during cooling system overhauls. Also, if there are strange noises, cooling is weak, or fluid is leaking, change the clutch and blades. 

This is a perfect time to replace the unit while changing cooling parts. 

The coolant hoses may need to be removed from the fan shroud. Safely jack up E39 and put on jack stands. Remove under body tray and remove coolant hoses from fan shroud.

I have seen negative reviews for the MTC blades and I would stick to OEM or equivalent. I bought MTC blades and will be changing them out. 

I noticed a significant amount of air being moved and faster fan speed with the new Hella Behr clutch. I am so glad I replaced the clutch before it failed and the fan blade shattering. Google BMW fan blade shattering or explosion and see the catastrophic damage done.

RealOEM parts diagram below.