22 October 2016

How to Remove & Replace E39 5 Series Windshield Wiper Relay

DIY: BMW E39 01+ 5 Series Windshield Wiper Relay

If the windshield wipers do not work or start acting weird on your 5 Series, the simplest thing you can check or change is the Windshield Wiper Relay/Switch. The relay is located under the passenger side microfilter box and easy to get to.

This DIY applies to all E39 5 Series made after 2001. I believe the procedure is the same for earlier E39 models but the relay(s) are different.

Tools: 

  • 6mm hex bit socket and ratchet
  • Extension (Optional)
  • Dielectric Grease (Optional)
  • Flat head screwdriver 
Parts: 
Steps: 
  • Remove passenger side microfilter box.
Driver side box is pictured. Remove the Passenger side box.
    • Use a flat head screwdriver and push down on plastic tabs to disconnect air duct. (Red)
    • Unclip metal latch holding air filter cover. (Purple)
    • Remove air filter tray cover. (Yellow)
    • Remove cabin micro filter. 
    • Remove rubber trim/weather stripping around cabin filter tray. 
    • Squeeze and remove metal clip from screw holding tray to body of vehicle. (Blue)
    • Lift and remove cabin air tray. 
  • Remove relay box cover.
    • Remove four bolts (green) using 6mm hex bit socket and ratchet.
    • Remove relay box cover
      • There are two small plastic tabs/clips on the back of the cover that attaches to the relay box. Gently work the cover until it comes free, if the plastic is so brittle the clips may break which is okay since the cover is held by the other four bolts. 
  • Remove and replace old relay.
    • Relay location is circled in red.
    • Simply pull out and insert the relay. There is only one way the relay can be inserted and is dummy proof. 
    • Optional: Apply dielectric grease  to the relay pins to prevent corrosion or water damage. 

  • Check and see if windshield wipers are operating correctly. 
  • Re-installation is the opposite of removal steps. 
    • Re-attach relay box cover.
    • Install four 6mm hex bolts. 
    • Reinstall microfilter box with rubber trim, clips, and reattach air tube.
Notes:

The relay box also contains the fuel injector, DME, Auxiliary Fan, Air Pump, ABS, and Auxiliary Fan Stage 3 relays. This DIY has the exact same steps if you need to access these relays and fuses. 

If the windshield wipers are still not operational or acting funny, it may be the wiper switch on the driving column, wiper assembly, or wiper motor that is not working. The relay is the easiest and cheapest thing to check first.

Make sure relay box cover is snug and there are no cracks so there is no water coming into the relay box.

If you don't want to spend money on a new relay, you can try cleaning the relay contacts and see if the windshield wipers work. 

09 October 2016

BMW Shadowline Trim Paint Code

The paint code is 668 (Jet Black) for BMW Shadowline trim pieces.

My dealership refused to replace my Shadowline trim pieces even though the paint was starting to come off and the car is still under warranty. They advised me to pick up some touch up paint and cover the entire shadowline window trim.

Part # 51910419746 for the touch up paint with clearcoat.

05 September 2016

StopTech Street Performance Pads & Zimmerman Rotors

I swapped out the old, cracked, warped OEM rotors and Akebono Ceramic brake pads on my 2002 BMW E39 530i and installed StopTech Street Performance pads with Zimmerman coated rotors. How do I know the previous owner had Akebono pads installed? I have some extra unused pads and the part numbers match up and they look identical. There is still plenty of life left on the Akebono pads but I want something more aggressive so I went with StopTech.

Let me tell you how great the braking now feels. No more annoying shimmy or vibrations during braking, especially on off-ramps or coming down from the canyons, just nice solid brake application.

I bought my 530i used and I believe the rear rotors are original and pads are Akebono so I can't tell you how the initial bite feels compared to OEM Jurid pads. All I can say is the speed sheds quickly and the bite is pretty strong. Performance is awesome and confidence inspiring in spirited driving, I haven't had any fading or sketchy issues and I believe the DOT4 fluid helps a lot. The response is such a night and day difference that I have never felt before in this car.

Another great benefit of the Zimmerman zinc coated rotors is the way they look through the wheels, no more ugly rust that screams for attention. It is unfortunate to see a perfectly detailed car with rusted hubs.

I highly recommend this combo for daily driving, light track duty, and canyon driving. If you are looking for low dust and no noise, I would suggest going with the Akebono Ceramic brake pads with Zimmerman rotors. I did consider getting Hawk pads but that would have been overkill. Let me know what brake/rotor combos have worked well for you and leave a comment below.

1 month update: 
The StopTech pads dust a lot, if I don't wash my car every week the wheels are almost black. Performance is still amazing with whiplash inducing force if I slam on the brakes. These pads inspire a lot of confidence in driving and I can't recommend them enough.

No wonder why I was getting vibrations and squeaking noises, the rotors are all scored and have cracks.
Zimmerman rotors looking good with Bilstein Sports.
Zimmerman Rotor packaging.

03 September 2016

Veterans Preference - Jobs

Does Veterans preference really work? Is it all a lie?

There are a lot of State and Federal jobs out there that claim Veterans preference but do they really take that into account or are qualified Veterans turned down?


06 August 2016

BMW E39 530i Front End Shimmy

When I bought and first drove my 530i, I noticed a severe steering wheel shimmy around 45-55 mph, 75 mph, and during braking.

I ruled out warped rotors as the primary cause since the worst vibrations occurred during driving. I decided it was one or all of the front arms or unbalanced wheels causing shudder. I highly doubted the previous owner performed any preventative maintenance and I was right, all the suspension pieces were original and have never been changed out.

I switched out the old lower front control arms with Lemforder arms and a large majority of the shimmy went away. The really bad 45-55 mph wobble was gone but the higher speed vibrations remained. After switching out the thrust arms all shimmies are gone and the 530i drives great.

22 July 2016

H&R Sport Springs and Bilstein Sport Shocks on my E39 530i

I recently upgraded my OEM shocks and springs on my E39 530i to H&R Sport Springs (29742-1) and Bilstein Sport Shocks. The front control arms, front and rear sway links were also replaced with Lemforder parts.

My first impressions is how bumpy, firm and extremely stiff the 530i now handles. I knew the ride was going to be more harsh, but I did not expect it to be so bouncy and bone shattering. Going over large bumps and dips is like going on a roller coaster, you feel front end dive and then recoil hard. Watching the rear view mirror shimmy and shake while driving is something new.

Not all is unpleasant with the H&R and Bilstein upgrade. The car feels planted and confidence inspiring on the highways and smooth roads. Turning into corners and canyon driving is a blast and this is where the sporty setup shines. I can take corners with much more stability and poise than ever before.

So is it worth going from OEM to H&R and Bilstein sports? I say yes. The setup is much cheaper than replacing with OEM parts and looks even more sporty. All the annoyances go away once you turn into a corner. Another benefit is how flat and stable the 530i feels under braking and accelerating, no more dipping and diving at stop lights.

If comfort is you are looking for, then go for OEM.

Update 1: I love the way sporty and conservative look with the springs. Time for some bigger wheels to fill the wheel well.

After driving a couple of hundred miles, I would say the ride is less jarring than run flats. I still find it funny during braking and feeling the car rock back and forth because the ride is so stiff.


Update 2: 10 months later and the ride is still very firm but a dream on the highway. Going into bends at 80 mph or attacking interchanges and hairpins is where the Bilsteins and H&R combo really shines. It feels so effortless and confidence inspiring on the highway.

Driving on city streets is still jarring but it has gotten better. I wouldn't say my ride is ruined like I read on the E39 forums but its still very bumpy.

30 June 2016

DIY: Brake Fluid Flush on BMW E39 5 Series

How to change brake fluid on a BMW E39 5-Series using the Motive European Power Brake Bleeder w/ Adapter


BMW recommends flushing brake fluid every two years for everyday street driving.

Tools: 
Parts:
Recommended:
  • Shop rags or towels to place around brake reservoir and underneath brake caliper for spills.
Steps:
  • Break torque on wheel lugs using 17 mm socket and ratchet
  • Safely jack up E39 and place on jack stands.
  • Remove lug nuts and wheels. 
  • Pop open hood and locate driver side cabin air filter tray.
  • Use a flat head screw driver and push down on the plastic tabs to disconnect air duct. (Red)
  • Unclip metal latch holding air filter cover. (Purple)
  • Remove air filter tray cover. (Yellow)
  • Remove cabin micro filter. 
  • Remove rubber trim around cabin filter tray. 
  • Disconnect electrical plug from hood sensor. (Green)
  • Squeeze and remove metal clip from screw holding tray to body of vehicle. (Blue)
  • Lift and remove cabin air tray.
  • Now you have access to the brake fluid reservoir.
  • Open reservoir cap (red circle) and suck out old brake fluid with a turkey baster. 
    • Place rags or towels around reservoir to soak up spills. Brake fluid will damage and remove paint. 
  • Fill brake reservoir to max with new DOT 4 brake fluid. 
  • Dump remaining brake fluid into Motive brake bleeder. 
  • Install adapter to brake fluid reservoir.
  • Pump brake bleeder to 15 psi.
  • Go to right rear brake caliper and locate the brake bleeder nipple. 
    • Now is a good time to inspect brake lines for any wear, rot, or damage. 

  • Remove cover from bleed screw and attach hose from bleeder bottle. 
    • If using 9 mm box end wrench, place it on bleed screw before attaching hose from bleeder bottle.
    • I sprayed penetrating oil on the screws for ease of loosening. 
  • Loosen bleed screw and wait until all the air bubbles and dirty brake fluid has left the hose.
    • Look for new, clear brake fluid before tightening bleed screw. 

  • Remove hose and reinstall cover. 
  • Pump Motive power bleeder to 15 psi.
  • Repeat the process for the left rear caliper, right front caliper and finally the left front caliper.
    • Make sure power bleeder is at 15 psi before each bleed. 
  • When completed, remove pressure from the power bleeder side and fill reservoir to max. 
  • Reinstall reservoir cap.
  • Reinstall cabin micro filter tray and rubber trim piece. 
  • Reinstall and torque wheels.
  • Jack and remove jack stands to lower E39. 
  • Test the brakes by moving a few feet before going on a drive. 
Notes:
Buy two 1-Liter bottles of brake fluid. One should be enough, but you want to have an extra liter in case of spills or shortage of fluid.

Gently loosen and tighten the brake bleed screws, it is easy to strip and damage them.

It is normal to have air bubbles in the hose from the power bleeder to the reservoir during fluid flush process.

Cover all areas where brake fluid may spill. Brake fluid will strip paint.

Minimize the amount of time new brake fluid will be exposed to air. Brake fluid is hygroscopic so remove the reservoir cap only when necessary. Properly dispose of any opened brake fluid bottles if not using in the near future.

This tutorial may apply to other BMW models.

I don't think the previous owner ever changed the brake fluid or within the past five years. The old brake fluid was extremely nasty and almost black.


22 May 2016

How to Replace Fan Clutch & Cooling Fan on a BMW E39 5 Series

DIY: BMW E39 5 Series Fan Clutch and Blades


Why:

A failing fan clutch can cause overheating conditions and catastrophic engine damage if ignored. Over time the viscous fluid has leaked or dried up causing the clutch to seize. Other conditions such as bearing failure can cause too much play and not enough drag. You can test clutch friction by spinning the fan blades when the car is turned off. If you are able to freewheel and spin the fan without any tension the fan clutch is bad. Other symptoms aside from overheating include rumbling, rattling, or scraping noises and weak air flow.

To make a potentially bad situation worse, the plastic fan blades become brittle and fragile over time. Cracks may develop or blades start to disintegrate causing the fan to shatter sending fragments into the radiator, pulleys, belts, hood, power steering reservoir and hoses. A bad water pump bearing or pulley may also send the fan into the radiator causing it to explode. 

To prevent these damages from occurring, proactively replace the clutch fan and blades when overhauling the cooling system between 60K - 90K miles or immediately when symptoms arise. 

This DIY is specific to inline-6 E39s and may apply to E46s. The steps are similar to V8 E39s, the difference is the fan shroud does not need to be removed on M5s or the 540i.

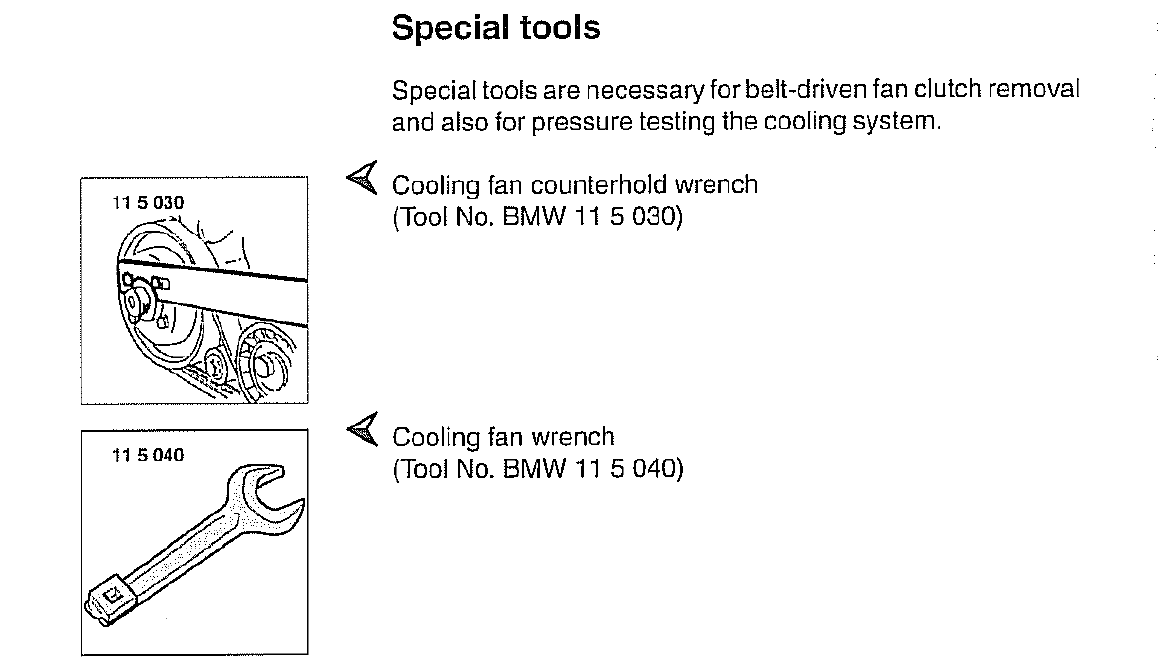
Tools:
  • Flat head screwdriver or plastic body panel removing tool
  • Phillips screwdriver (to remove expansion tank bleed screw)
Taken from Bentley Publishers E39 manual.
Parts: 

  • Fan blades Part # 11521712058. 
    • I bought the MTC fan and I wish I read other driver's comments before the purchase. MTC fan blades are built in China and have reported to crack in a year. Stick with OEM or Febi fan blades. 
  • Fan Clutch Part # 11527505302.
  • Three screws attaching fan to clutch
    • Optional if original screws are in good condition
    • Part # 07129905536
Recommended:
  • Anti-seize
    • Removing fan clutch in the future much easier. 
  • Fan shroud rivets Part # 1711712963 
    • In case you lose or damage them removing fan shroud.
  • Penetrating oil
  • Expansion tank cap seal Part # 17111723580
    • In case of damage while removing. 
Steps: 
  • Pop open or remove rivets on both sides of fan shroud. Circled in red below. 
Driver side rivet.
Passenger/Expansion tank side.
  • Use Phillips screw driver and remove bleed screw on expansion tank. Blue dot in picture below.
  • Use flat tip screwdriver or fingers and remove expansion tank cap seal. Red dots in picture below.
    • Squeeze two plastic tabs together and pull seal out.
  • Push expansion tank backwards out from fan shroud. 
  • Reinstall bleed screw.
  • Place fan clutch holding tool on two water pump pulley bolts.
    • Use the appropriate side of the holding tool depending on which two pulley bolts are easiest to get to. 
  • Place 32 mm wrench on clutch fan nut to remove clutch. 
    • Turn wrench clockwise while holding counterholding tool on pulley bolts to loosen fan clutch nut.
      • Nut may be very hard to remove so use PB blaster or other penetrating oil on the nut. Be careful not to spill any oil onto the belts. 
      • A lot of force may be necessary to loosen the nut. 
      • Remove air intake box to get better access to water pump bolts with counter hold tool.
      • If you are overhauling cooling system or changing the thermostat, removing the radiator to thermostat hose will help greatly in getting access to the water pump pulley bolts. 
    • I was not able to get good pictures of the clutch nut so I scanned and added Bentley manual pages below.


  • One the nut is loose, spin fan blades clockwise until clutch is off water pump threads. 
  • Carefully hold fan and raise fan shroud.
    • Other DIYs and manuals say to remove cooling hoses from the bottom and side of the fan shroud. I did not do this because I only raised the fan shroud a few inches to slide the fan and clutch out. Just be careful not to damage any of the hoses if you don't remove them. 
  • Slide blades and clutch fan up and away from shroud. 
My original fan coated in grime. 
  • Remove three screws holding blades to clutch. Red dots on picture below. 
    • They are 5 mm Allen/Hex screws. They have a lot of grime and may be difficult to remove. Penetrating oil will help greatly. Be careful not to strip the bolts. Part # 07129905536 if they are missing or damaged. 
  • Place new fan on new clutch. Ensure blades are going the right direction and not installed backwards.
  • Install three 5 mm Hex screws to attach fan to clutch. 
    • Use new screws if original are in bad condition
I bought MTC fan blades. Do not make the same mistake.
  • Carefully raise fan shroud and insert fan into shroud. 
  • Screw fan clutch nut over water pump threads. Spin fan counter-clockwise to tighten nut. This may require some time and patience.
    • Add anti-seize to pulley threads for easier removal in the future. 
  • Tighten clutch nut onto water pump. Torque figures are in the picture below. 

Installed!
Bentley manual torque figures.
  • Remove bleed screw and push expansion tank back into fan shroud.
  • Reinstall expansion tank seal.
  • Reinstall bleed screw.
  • Ensure fan shroud is correctly seated.
    • Reinstall any cooling hoses if they were removed. 
  • Pop in or reinstall two rivets on each side of fan shroud.
  • Start E39 and observe fan clutch operation. 
    • There should be much more air flowing through the fan and no growling or rumbling noises. Do not put your hands or fingers in fan!  
Notes:

V8 equipped E39s do not need to remove fan shroud to access fan clutch nut.

Do not put your hands or fingers in the fan while the car is running. I would not try the newspaper test because the fan blades can be brittle and may shatter when inserting the newspaper. Test clutch friction and tension by trying to spin the blades while the car is off or replace the unit during cooling system overhauls. Also, if there are strange noises, cooling is weak, or fluid is leaking, change the clutch and blades. 

This is a perfect time to replace the unit while changing cooling parts. 

The coolant hoses may need to be removed from the fan shroud. Safely jack up E39 and put on jack stands. Remove under body tray and remove coolant hoses from fan shroud.

I have seen negative reviews for the MTC blades and I would stick to OEM or equivalent. I bought MTC blades and will be changing them out. 

I noticed a significant amount of air being moved and faster fan speed with the new Hella Behr clutch. I am so glad I replaced the clutch before it failed and the fan blade shattering. Google BMW fan blade shattering or explosion and see the catastrophic damage done.

RealOEM parts diagram below.