Showing posts with label How to. Show all posts

13 April 2018

BMW E90/92 Brake Job Must Read

If you change your BMW brake pads and/or rotors, you must change both wear sensors at the same time. The BMW will trigger a brake wear warning if you only replace one sensor. I learned this the hard way.

I replaced my rear rotors and brake pads with Zimmerman Z-Coat and StopTech. For the brake sensor, I used a non-OEM brand named Bowa. Huge mistake. The Bowa sensors are one-third the price of OEM sensors for a reason. They have almost no shielding for the wire that plugs into the brake pads that rubs against your suspension causing breaks and fraying. I cannot recommend buying OEM brake sensors enough because the entire wire is protected. 

I'm certain that changing the rear brake sensor only tripped the warning light, but lets say I changed both sensors at one time. The light still would have triggered because the Bowa wires were frayed after a couple of drives. 

Please save yourself the headache and change all brake pads, rotors, and sensors at once and do a reset. It will save you the time of taking everything apart again.

Apparently the BMW computer measures the wear at both sensors at the same time. If one changes but the other is the same it triggers the brake warning light. 

30 December 2017

E90 Electric Fan Removal and Installation Tips

I've seen posts that say removing the E90 electric fan and fan shroud is super easy and others that took several hours.

For me, it was a huge hassle because of the rubber piece that is attached to the pipe after the intercooler. The electric fan would not come out no matter how hard I pulled. Removing the two torx bolts and the plastic clip above the rubber piece were super easy but I got stuck after that.

I circled the rubber piece in orange below. It is located on the driver side of the electric fan.


Here is how I finally got the plastic clip loose and fan free:

  • I got a very long flat head screwdriver
  • Placed screwdriver between rubber and plastic clip on intercooler pipe. 
  • Pushed and pried plastic clip off rubber piece. It may help to get one side of the clip loose first and then pry from the center. 
Installing the fan did not go smoothly as well. I kept getting snapped on the plastic part of the brace which I circled below. 


Some other things to be aware of:
  • Be careful to not snag or pinch wiring or fan controller underneath brace
  • Pull coolant hose towards engine as you are lowing electric fan
  • The plastic clip on the intercooler pipe was causing issues for me and bent the rubber piece. I used the screwdriver as a guide and straighten the rubber piece. 
  • It helps a lot to have another person on removal and installation since the clearance is so tight. 
Removing the cooling fan and shroud will make life a lot easier in removing and replacing the tensioner, pulleys, and belt. I strongly suggest using the Continental belt. 

09 December 2017

E39 Ignition Switch Removal Tips

BMW E39 5 Series Ignition Switch Removal Tips

There are multitudes of tutorials on how to remove and replace ignition switch on E39s. Here are useful tips I learned that were not pointed out or emphasized enough in those DIYs.
  • Push in the clips on top clam shell cover nearest steering wheel while pulling down on lower clam shell to gain access to switch. Be very careful as the plastic clips are fragile. This took me longer than expected until I found where to push in. 
  • Remove lower clam shell all the way by using needle nose pliers to push in two side and three bottom tabs. 
    • This will greatly help in using screwdriver to back out screws holding in switch
  • Remove wood trim pieces on left and right side of steering wheel using plastic pry tools. Then use Phillips screwdriver to remove screws and lower dash. 
    • Absolutely necessary for access to top T27 torx bolt. 
  • Use a 1/4 inch ratchet and the smallest T27 Torx socket for top torx bolt. 
    • Space is extremely tight. I used needle nose pliers to loosen and tighten torx bolt because my ratchet was pressed against the dash while removing the torx bolt. 
    • Other tutorials say the bolt is T30 however mine was T27. 
  • A E39/E38 Steering column vibration mount (PN 1093829 or 32311093829) was in lower clam shell upon removal. I don't know how to put it back and left it out with no noticeable difference in driving. 
  • You must use flat head screwdriver to position white plastic part inside new switch to where old switch was positioned. Otherwise your new switch will not work. It looks like a T carved into white plastic. 

My bad ignition switch symptoms:
I changed my engine mounts and the airbag light came on. It was intermittent and would flash on and off with strange clunking noises coming from the steering wheel. I lost all steering wheel controls and my radio would stay off after I shut off the 530i. The lower portion of the radio LCD would not illuminate and it would take me several minutes of pushing the volume knob to turn off the radio. 

I figured the switch was faulty by using the passenger and driver side vanity mirror test. All radio electronics would shut off by sliding the vanity mirror cover and the airbag light went off. 

Luckily it was a bad switch and not a clock spring or slip ring. This job is simple but can be annoying due to the tight fit of everything, especially the top T27 bolt. I estimate this will take 1-2 hours to replace. 

I noticed my LCD displays are much brighter with the new switch. Looking back that was probably the only warning that my switch was going out.

03 December 2017

E39 Engine/Motor Mounts Helpful Info

There are many tutorials on how to replace engine mounts for E39s but here are some useful tips that they are missing or did not emphasize enough. This job is simple and can be done relatively quickly with my tips below.

Tips: 
  • My driver side mount required a 21 mm socket for the top cover
  • Universal sockets or adapter is required due to the angle of the nuts
  • Raise the car onto four jack stands or ramps. I made the mistake of only lifting the front and it was impossible to remove the mounts
  • Other tutorials say jack engine one or two inches. That is not enough to remove passenger side engine mount. You must remove engine fan using 32 mm wrench and holding tool to lift engine. Otherwise the fan will bump into fan shroud and crack
  • I highly recommend using two people when lowering engine. One person lowers car jack while other person ensures engine mount studs go through mounting holes
  • Penetrating oil on the nuts, especially if mounts have never been replaced before
  • Motor mounts are a good preventative maintenance item on E39s and E46s because if they fail the engine fan could hit the shroud and explode, destroying your coolant lines. 
  • Use a deep 16 mm socket for the nuts. 
Go with Lemforder engine mounts, they are OEM for BMW. Other brand engine mounts are much cheaper but will not last long. 

There is a big difference in ride quality and idle smoothness after changing my engine mounts. No more harsh idle or front swaying in corners.

I don't know if it's a coincidence or changing my mounts caused my airbag light to go on and steering wheel radio controls to stop working. When I turn off the car the radio keeps playing. 

22 October 2016

How to Remove & Replace E39 5 Series Windshield Wiper Relay

DIY: BMW E39 01+ 5 Series Windshield Wiper Relay

If the windshield wipers do not work or start acting weird on your 5 Series, the simplest thing you can check or change is the Windshield Wiper Relay/Switch. The relay is located under the passenger side microfilter box and easy to get to.

This DIY applies to all E39 5 Series made after 2001. I believe the procedure is the same for earlier E39 models but the relay(s) are different.

Tools: 

  • 6mm hex bit socket and ratchet
  • Extension (Optional)
  • Dielectric Grease (Optional)
  • Flat head screwdriver 
Parts: 
Steps: 
  • Remove passenger side microfilter box.
Driver side box is pictured. Remove the Passenger side box.
    • Use a flat head screwdriver and push down on plastic tabs to disconnect air duct. (Red)
    • Unclip metal latch holding air filter cover. (Purple)
    • Remove air filter tray cover. (Yellow)
    • Remove cabin micro filter. 
    • Remove rubber trim/weather stripping around cabin filter tray. 
    • Squeeze and remove metal clip from screw holding tray to body of vehicle. (Blue)
    • Lift and remove cabin air tray. 
  • Remove relay box cover.
    • Remove four bolts (green) using 6mm hex bit socket and ratchet.
    • Remove relay box cover
      • There are two small plastic tabs/clips on the back of the cover that attaches to the relay box. Gently work the cover until it comes free, if the plastic is so brittle the clips may break which is okay since the cover is held by the other four bolts. 
  • Remove and replace old relay.
    • Relay location is circled in red.
    • Simply pull out and insert the relay. There is only one way the relay can be inserted and is dummy proof. 
    • Optional: Apply dielectric grease  to the relay pins to prevent corrosion or water damage. 

  • Check and see if windshield wipers are operating correctly. 
  • Re-installation is the opposite of removal steps. 
    • Re-attach relay box cover.
    • Install four 6mm hex bolts. 
    • Reinstall microfilter box with rubber trim, clips, and reattach air tube.
Notes:

The relay box also contains the fuel injector, DME, Auxiliary Fan, Air Pump, ABS, and Auxiliary Fan Stage 3 relays. This DIY has the exact same steps if you need to access these relays and fuses. 

If the windshield wipers are still not operational or acting funny, it may be the wiper switch on the driving column, wiper assembly, or wiper motor that is not working. The relay is the easiest and cheapest thing to check first.

Make sure relay box cover is snug and there are no cracks so there is no water coming into the relay box.

If you don't want to spend money on a new relay, you can try cleaning the relay contacts and see if the windshield wipers work. 

30 June 2016

DIY: Brake Fluid Flush on BMW E39 5 Series

How to change brake fluid on a BMW E39 5-Series using the Motive European Power Brake Bleeder w/ Adapter


BMW recommends flushing brake fluid every two years for everyday street driving.

Tools: 
Parts:
Recommended:
  • Shop rags or towels to place around brake reservoir and underneath brake caliper for spills.
Steps:
  • Break torque on wheel lugs using 17 mm socket and ratchet
  • Safely jack up E39 and place on jack stands.
  • Remove lug nuts and wheels. 
  • Pop open hood and locate driver side cabin air filter tray.
  • Use a flat head screw driver and push down on the plastic tabs to disconnect air duct. (Red)
  • Unclip metal latch holding air filter cover. (Purple)
  • Remove air filter tray cover. (Yellow)
  • Remove cabin micro filter. 
  • Remove rubber trim around cabin filter tray. 
  • Disconnect electrical plug from hood sensor. (Green)
  • Squeeze and remove metal clip from screw holding tray to body of vehicle. (Blue)
  • Lift and remove cabin air tray.
  • Now you have access to the brake fluid reservoir.
  • Open reservoir cap (red circle) and suck out old brake fluid with a turkey baster. 
    • Place rags or towels around reservoir to soak up spills. Brake fluid will damage and remove paint. 
  • Fill brake reservoir to max with new DOT 4 brake fluid. 
  • Dump remaining brake fluid into Motive brake bleeder. 
  • Install adapter to brake fluid reservoir.
  • Pump brake bleeder to 15 psi.
  • Go to right rear brake caliper and locate the brake bleeder nipple. 
    • Now is a good time to inspect brake lines for any wear, rot, or damage. 

  • Remove cover from bleed screw and attach hose from bleeder bottle. 
    • If using 9 mm box end wrench, place it on bleed screw before attaching hose from bleeder bottle.
    • I sprayed penetrating oil on the screws for ease of loosening. 
  • Loosen bleed screw and wait until all the air bubbles and dirty brake fluid has left the hose.
    • Look for new, clear brake fluid before tightening bleed screw. 

  • Remove hose and reinstall cover. 
  • Pump Motive power bleeder to 15 psi.
  • Repeat the process for the left rear caliper, right front caliper and finally the left front caliper.
    • Make sure power bleeder is at 15 psi before each bleed. 
  • When completed, remove pressure from the power bleeder side and fill reservoir to max. 
  • Reinstall reservoir cap.
  • Reinstall cabin micro filter tray and rubber trim piece. 
  • Reinstall and torque wheels.
  • Jack and remove jack stands to lower E39. 
  • Test the brakes by moving a few feet before going on a drive. 
Notes:
Buy two 1-Liter bottles of brake fluid. One should be enough, but you want to have an extra liter in case of spills or shortage of fluid.

Gently loosen and tighten the brake bleed screws, it is easy to strip and damage them.

It is normal to have air bubbles in the hose from the power bleeder to the reservoir during fluid flush process.

Cover all areas where brake fluid may spill. Brake fluid will strip paint.

Minimize the amount of time new brake fluid will be exposed to air. Brake fluid is hygroscopic so remove the reservoir cap only when necessary. Properly dispose of any opened brake fluid bottles if not using in the near future.

This tutorial may apply to other BMW models.

I don't think the previous owner ever changed the brake fluid or within the past five years. The old brake fluid was extremely nasty and almost black.


22 May 2016

How to Replace Fan Clutch & Cooling Fan on a BMW E39 5 Series

DIY: BMW E39 5 Series Fan Clutch and Blades


Why:

A failing fan clutch can cause overheating conditions and catastrophic engine damage if ignored. Over time the viscous fluid has leaked or dried up causing the clutch to seize. Other conditions such as bearing failure can cause too much play and not enough drag. You can test clutch friction by spinning the fan blades when the car is turned off. If you are able to freewheel and spin the fan without any tension the fan clutch is bad. Other symptoms aside from overheating include rumbling, rattling, or scraping noises and weak air flow.

To make a potentially bad situation worse, the plastic fan blades become brittle and fragile over time. Cracks may develop or blades start to disintegrate causing the fan to shatter sending fragments into the radiator, pulleys, belts, hood, power steering reservoir and hoses. A bad water pump bearing or pulley may also send the fan into the radiator causing it to explode. 

To prevent these damages from occurring, proactively replace the clutch fan and blades when overhauling the cooling system between 60K - 90K miles or immediately when symptoms arise. 

This DIY is specific to inline-6 E39s and may apply to E46s. The steps are similar to V8 E39s, the difference is the fan shroud does not need to be removed on M5s or the 540i.

Tools:
  • Flat head screwdriver or plastic body panel removing tool
  • Phillips screwdriver (to remove expansion tank bleed screw)
Taken from Bentley Publishers E39 manual.
Parts: 

  • Fan blades Part # 11521712058. 
    • I bought the MTC fan and I wish I read other driver's comments before the purchase. MTC fan blades are built in China and have reported to crack in a year. Stick with OEM or Febi fan blades. 
  • Fan Clutch Part # 11527505302.
  • Three screws attaching fan to clutch
    • Optional if original screws are in good condition
    • Part # 07129905536
Recommended:
  • Anti-seize
    • Removing fan clutch in the future much easier. 
  • Fan shroud rivets Part # 1711712963 
    • In case you lose or damage them removing fan shroud.
  • Penetrating oil
  • Expansion tank cap seal Part # 17111723580
    • In case of damage while removing. 
Steps: 
  • Pop open or remove rivets on both sides of fan shroud. Circled in red below. 
Driver side rivet.
Passenger/Expansion tank side.
  • Use Phillips screw driver and remove bleed screw on expansion tank. Blue dot in picture below.
  • Use flat tip screwdriver or fingers and remove expansion tank cap seal. Red dots in picture below.
    • Squeeze two plastic tabs together and pull seal out.
  • Push expansion tank backwards out from fan shroud. 
  • Reinstall bleed screw.
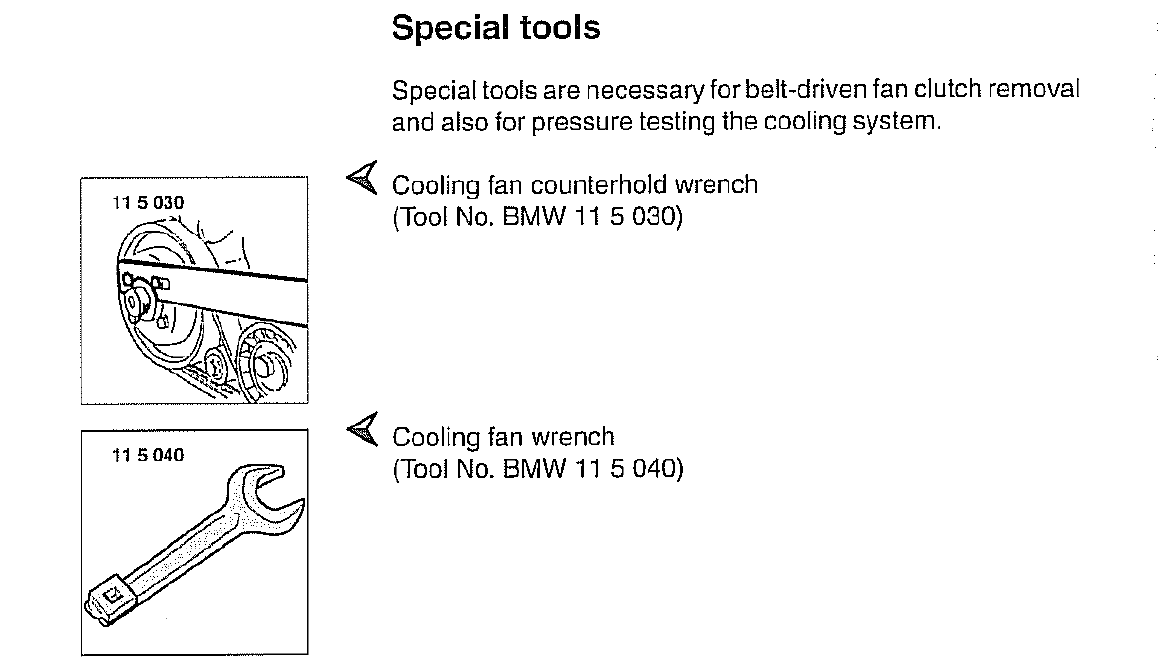
  • Place fan clutch holding tool on two water pump pulley bolts.
    • Use the appropriate side of the holding tool depending on which two pulley bolts are easiest to get to. 
  • Place 32 mm wrench on clutch fan nut to remove clutch. 
    • Turn wrench clockwise while holding counterholding tool on pulley bolts to loosen fan clutch nut.
      • Nut may be very hard to remove so use PB blaster or other penetrating oil on the nut. Be careful not to spill any oil onto the belts. 
      • A lot of force may be necessary to loosen the nut. 
      • Remove air intake box to get better access to water pump bolts with counter hold tool.
      • If you are overhauling cooling system or changing the thermostat, removing the radiator to thermostat hose will help greatly in getting access to the water pump pulley bolts. 
    • I was not able to get good pictures of the clutch nut so I scanned and added Bentley manual pages below.


  • One the nut is loose, spin fan blades clockwise until clutch is off water pump threads. 
  • Carefully hold fan and raise fan shroud.
    • Other DIYs and manuals say to remove cooling hoses from the bottom and side of the fan shroud. I did not do this because I only raised the fan shroud a few inches to slide the fan and clutch out. Just be careful not to damage any of the hoses if you don't remove them. 
  • Slide blades and clutch fan up and away from shroud. 
My original fan coated in grime. 
  • Remove three screws holding blades to clutch. Red dots on picture below. 
    • They are 5 mm Allen/Hex screws. They have a lot of grime and may be difficult to remove. Penetrating oil will help greatly. Be careful not to strip the bolts. Part # 07129905536 if they are missing or damaged. 
  • Place new fan on new clutch. Ensure blades are going the right direction and not installed backwards.
  • Install three 5 mm Hex screws to attach fan to clutch. 
    • Use new screws if original are in bad condition
I bought MTC fan blades. Do not make the same mistake.
  • Carefully raise fan shroud and insert fan into shroud. 
  • Screw fan clutch nut over water pump threads. Spin fan counter-clockwise to tighten nut. This may require some time and patience.
    • Add anti-seize to pulley threads for easier removal in the future. 
  • Tighten clutch nut onto water pump. Torque figures are in the picture below. 

Installed!
Bentley manual torque figures.
  • Remove bleed screw and push expansion tank back into fan shroud.
  • Reinstall expansion tank seal.
  • Reinstall bleed screw.
  • Ensure fan shroud is correctly seated.
    • Reinstall any cooling hoses if they were removed. 
  • Pop in or reinstall two rivets on each side of fan shroud.
  • Start E39 and observe fan clutch operation. 
    • There should be much more air flowing through the fan and no growling or rumbling noises. Do not put your hands or fingers in fan!  
Notes:

V8 equipped E39s do not need to remove fan shroud to access fan clutch nut.

Do not put your hands or fingers in the fan while the car is running. I would not try the newspaper test because the fan blades can be brittle and may shatter when inserting the newspaper. Test clutch friction and tension by trying to spin the blades while the car is off or replace the unit during cooling system overhauls. Also, if there are strange noises, cooling is weak, or fluid is leaking, change the clutch and blades. 

This is a perfect time to replace the unit while changing cooling parts. 

The coolant hoses may need to be removed from the fan shroud. Safely jack up E39 and put on jack stands. Remove under body tray and remove coolant hoses from fan shroud.

I have seen negative reviews for the MTC blades and I would stick to OEM or equivalent. I bought MTC blades and will be changing them out. 

I noticed a significant amount of air being moved and faster fan speed with the new Hella Behr clutch. I am so glad I replaced the clutch before it failed and the fan blade shattering. Google BMW fan blade shattering or explosion and see the catastrophic damage done.

RealOEM parts diagram below.


21 May 2016

BMW E39 5 Series Oil Fill Cap

I replaced the oil fill cap on my E39 530i because it was very difficult to twist and remove. The rubber seal had hardened into plastic and covered in sludge. The seal is bad so I did not use silicone grease on the seal to ease in removal.

The two plastic prongs over the metal tabs are missing on the original cap. I don't know if it came from the factory without the two prongs and were added to new caps or if the previous owner broke them.

I have been working on resolving the intermittent P0171 and P0174 codes as described here and have been reading various BMW forums for solutions. I came across a few posts that say a bad oil filler cap seal will cause these codes. It seems like a stretch but I needed to replace the cap anyways.

Picture of the old oil filler cap versus new.


Oil filler cap Part # 11127509328 
  • Compatible with E36, E46, E60, E53, E34, E66, E65, E70, and E85 BMW models.

DIY: BMW E39 5 Series Cabin Air Filter

How to replace cabin air microfilters on the BMW E39 5 Series (1997 - 2003)

Parts:
Recommended:
Steps:
  • Pop open hood
  • Locate two cabin filter service covers. One is located on the driver side and the other on the passenger side behind the strut towers. 

  • Unclip wire latch circled in red below. Do this on both sides. 

A screwdriver may be used if it is difficult to unclip.
  • Pull filter cover out towards you. Be careful not to damage the two rear plastic tabs. 
    • Part # 64318379627 left and part # 64318379626 right in case they need to be replaced. 
  • Remove old cabin air filters. 
Old micro filter.
    • I don't think the previous owner ever changed the filters. Look at all the dusty, mold, and crap that on the old filter. Yuck! New Mann filter looks so much better. 

  • Clean filter box by vacuuming leaves, wiping away any dirt and debris. Ensure intake and drain holes are clear. 
  • Now is good time to spray any Lysol or A/C cleaner into the air box intake to remove nasty and funky smells. 
Previous owner never cleaned the box so there is dust and debris everywhere. 
  • Install new filters by placing them in box. 
    • There are directional air flow arrows on the Mann filter which tells you which side is up. 
    • Many filters have less pleats than before and do not fit perfectly in the air box. There may be some gaps on the side and distortion. Unfortunately, I haven't found a brand that is a perfect fit. 
  • Install covers by inserting rear tabs in first
  • Reclip wire latches onto covers.
Notes: 
You want to replace the microfilters regularly to ensure pollen, dust, harmful gases, and spores are removed from the ventilation system. Spend the extra money and get the charcoal filters for optimal filtration. 

If you do not replace them, they will look as nasty as the old filters and you will be breathing all that crap. This is a 5 minute job and the filters are cheap, just do it yourself. A mechanic will charge too much to replace the filters and may not remove the debris hanging out in the box. 

The filters come in pairs.

Helpful picture below. Taken from BMW Parts manual.


Here is a Top Gear clip of Jeremy Clarkson banging on the cabin air box with a hammer. Jeremy thinks it is a fuse box and Richard and James correct him.

Why: 
Microfilters clean the air in the cabin of your BMW. A dirty and clogged microfilter means you and your passengers are breathing in that polluted air. Microfilters remove contaminants, pollen, pollutants from the air going into the cabin. This is the quickest and easiest jobs you can do and I am shocked that the previous owner never changed them. 

07 May 2016

How to Change Engine Oil on a BMW E39 530i

DIY draining and refilling engine oil on 6 cylinder E39s. May apply to other models with the M54B30 or M52 engine.


Tools:
  • 17 mm socket
  • 35/36 mm socket 
  • Ratchet(s)
  • Oil drain pan
  • Ramps or jack and jack stands
Parts:  
Recommended:
  • Any shop rag, towel, oil eater pad, kitty litter or oil absorbent to clean spills, gloves. 
  • Jack point adapter to prevent damaging jack point. 
  • Funnel
Steps: 
  • Drive BMW for a short period to warm engine oil.
  • Drive onto ramps or use a jack and jack stands to lift front end. 
    • Use jack pad adapters to prevent crushing plastic jack points. 
    • Place wheel chocks on rear wheels and set parking brake to prevent BMW from sliding.

Jack points in the Bentley Manual
  • Open hood
  • Use a 35/36 mm socket and ratchet to remove oil housing cap and filter. I use the Lisle 35/36 mm socket for its low profile and strength.
    • Place rags or pigmat around filter to soak up any oil.
    • Set the oil cap and filter aside after removing. 
Lisle socket on oil filter cap
  • Get underneath vehicle and locate oil drain plug. The plug is right behind the front jack point.
    • Your E39 may have plastic paneling or trap door that covers your oil pan, my 530i did not. I do not know if the vehicle did not come with the panels or the previous owner removed them. 
Oil drain plug highlighted in red.
  • Use 17 mm socket and remove drain plug. 
    • Place oil drain pan where you think the oil will come out. The plug is not facing downwards so oil will shoot out towards the passenger side. I use my Lisle Black Pan for its large capacity and spout.  
    • Do not use an impact wrench to remove or install plug. 
  • Remove the old filter from cap while the oil is draining.
    • Pull filter straight out. This may require moderate force. 
  • Replace large o-ring on oil filter cap. 
    • Use a scribe or small flat head screw drive to remove old o-ring. Be careful not to damage oil filter cap.
    • Check condition of two small o-rings and replace if necessary. Part # 11421744001
    • Coat new o-ring with new oil and install. Please note proper location of O-ring by referencing picture below. 
  • Install oil filter and filter cap
    • Use 35/36 mm socket and torque to 18 ft-lbs
    • Optional: Install filter cap after inserting oil drain plug. I put one quart of oil into the oil filter housing and the rest into the engine.
  • Place new copper gasket on drain plug and install using 17 mm socket. 
    • Torque to 25 ft-lbs. 
    • I installed a MTC magnetic drain plug because the original plug was complete rusted and the previous owner rounded the plug head. 
    • Reinstall any body paneling or trap doors if equipped. 
MTC magnetic plug
MTC magnetic plug installed
  • Remove wheel chocks
  • Carefully lower BMW by driving off ramps or jacking and removing jack stands. 
  • Remove oil cap and fill with 6.5 liters or 6.7 quarts. 
    • Use dipstick to check if oil is within limits, add more if necessary. 
    • Use a funnel to prevent spills. I use the Hopkins funnel and it works fine.
Oil filler cap location and locking funnel.
  • Reinstall oil cap. 
  • Close hood and take a 10-15 minute drive. Check if there are any leaks. 
Notes: 
I used Mobil 1 because of their 5 quart rebates. Amazon and Walmart sell their 5 quarts for $23 and with the $12 rebate it only costs $11. 


30 April 2016

How to Change Spark Plugs on a BMW E39 530i

DIY: Spark plugs on BMW E39s equipped with M54 inline six engines. May apply to M52 engines and E46s.
BMW recommends the spark plugs be changed every 100,000 miles which seems a bit high. Many drivers suggest 60,000 - 80,000 miles.

Tools:
  • Various flat tip screwdrivers
  • 10 mm socket
  • Ratchets and extensions
  • 5/8" Spark plug socket
  • Torque wrench
Parts:
Recommended:
  • Dielectric grease for coil harness connectors
Steps: 
  • Open hood
  • Remove passenger side cabin filter hose. 
    • Optional. Will make this job much easier if removed. 
    • Use a flat tip screw driver and detach three clips.
    • Pull and remove hose from micro filter cabin box.
    • Twist and pull hose out from opening. See picture below.
Rubber O-ring that fits over the hole came off with the hose. Not sure if that is supposed to happen but it is easy to reinstall.
Hose completely removed.
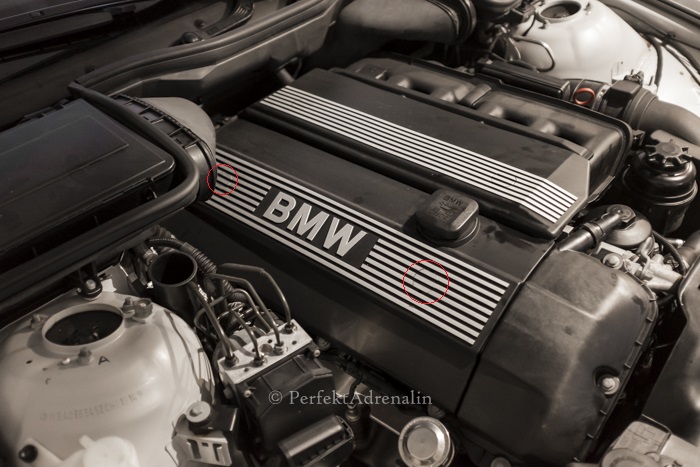
  • Use a flat tip screwdriver and pop out two small circular covers. See red circles below.
  • Use 10 mm socket and remove two nuts holding engine cover. Picture of 10 mm nut below.

  • Remove oil fill cap.
  • Remove engine cover.
  • Reinstall oil fill cap to ensure nothing falls into engine.
  • Use flat tip screwdriver and raise metal clips on each coil. 
  • Unplug female connector to each coil 
  • Use 10 mm socket and remove two 10 mm bolts holding each coil. 
    • Coil #1 and #6 have wires attached to them. Note their position for reinstallation. 
#6 Coil. Note the wire on the left.
  • Remove each coil by pulling them out.
    • Mark each coil to which cylinder they belong to or arrange them in order so they go back to the same spot on installation.
  • Use 5/8" spark plug socket and extension to remove spark plugs.
Original BMW NGK Spark Plugs removed.
  • Install new spark plugs with 5/8" socket and be careful not to cross thread. 
    • NGK plugs are coated with a metal jacket and do not need anti-seize.
    • The Bentley manual says to torque spark plugs to 18 lb-fts.
    • Various sources and NGK list the torque values around 20 - 25 lb-fts. 
  • Reinstall coils 
    • Install two 10 mm bolts to each coil
    • Apply dielectric grease (optional) to female connector and plug into coil
    • Press down on metal clips that lock connectors to each coil. 
  • Reinstall cabin air filter hose (if removed) 
    • Insert end into body of car and twist
    • Reinstall other end to filter box and pull towards box so the three clips snap into place
  • Remove oil fill cap
  • Reinstall engine cover and two 10 mm bolts securing cover
  • Reinstall oil fill cap
  • Reattach 2 small round clips over 10 mm engine cover bolts. 
Notes: 

It is a good idea to change any coils that are bad at the same time.
Check the plugs to see if there is any fouling or wet oil and gasoline on them
If you have a valve cover gasket leak, this would be a good time to change the gasket.
Changing the old spark plugs may clear any misfires or poor fuel economy and smooth the idle.
NGK says to not use anti-seize because there is a risk of over torque and it is not needed because their threads are coated. It is up to you to decide if you believe NGK and to use or not use anti-seize.