DIY: BMW E39 5 Series Fan Clutch and Blades
Why:
A failing fan clutch can cause overheating conditions and catastrophic engine damage if ignored. Over time the viscous fluid has leaked or dried up causing the clutch to seize. Other conditions such as bearing failure can cause too much play and not enough drag. You can test clutch friction by spinning the fan blades when the car is turned off. If you are able to freewheel and spin the fan without any tension the fan clutch is bad. Other symptoms aside from overheating include rumbling, rattling, or scraping noises and weak air flow.
A failing fan clutch can cause overheating conditions and catastrophic engine damage if ignored. Over time the viscous fluid has leaked or dried up causing the clutch to seize. Other conditions such as bearing failure can cause too much play and not enough drag. You can test clutch friction by spinning the fan blades when the car is turned off. If you are able to freewheel and spin the fan without any tension the fan clutch is bad. Other symptoms aside from overheating include rumbling, rattling, or scraping noises and weak air flow.
To make a potentially bad situation worse, the plastic fan blades become brittle and fragile over time. Cracks may develop or blades start to disintegrate causing the fan to shatter sending fragments into the radiator, pulleys, belts, hood, power steering reservoir and hoses. A bad water pump bearing or pulley may also send the fan into the radiator causing it to explode.
To prevent these damages from occurring, proactively replace the clutch fan and blades when overhauling the cooling system between 60K - 90K miles or immediately when symptoms arise.
This DIY is specific to inline-6 E39s and may apply to E46s. The steps are similar to V8 E39s, the difference is the fan shroud does not need to be removed on M5s or the 540i.
Tools:
- Flat head screwdriver or plastic body panel removing tool
- Phillips screwdriver (to remove expansion tank bleed screw)
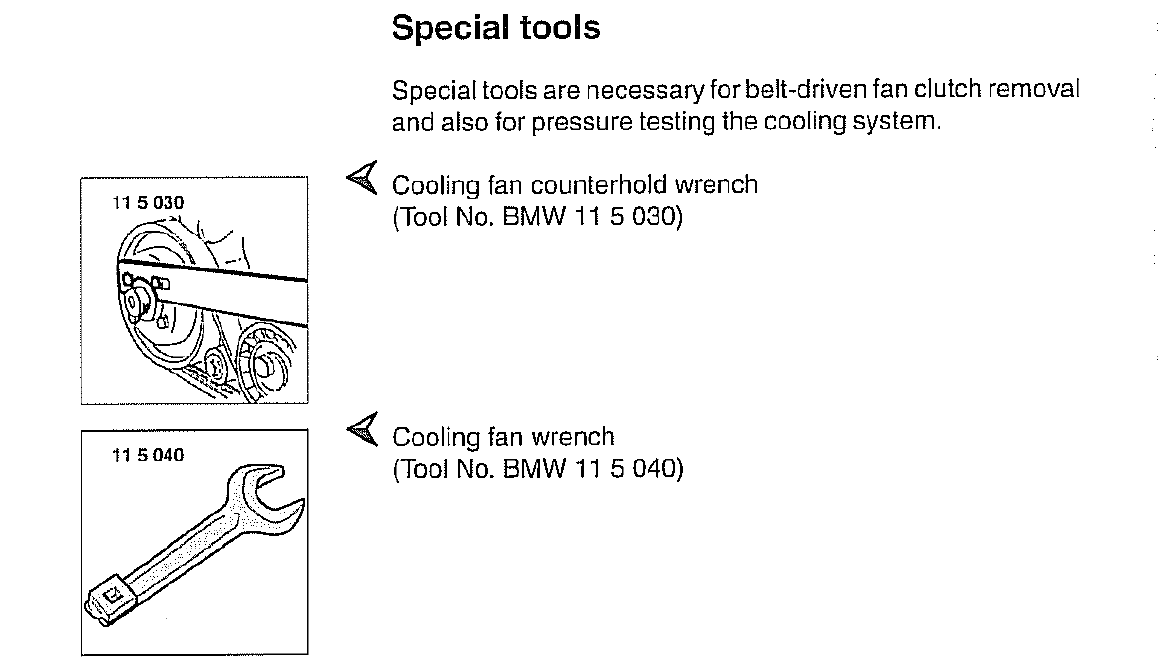
- 32 mm open ended wrench
- BMW special tool 115040
- Assenmacher 32mm Fan Clutch Wrench works well with the thin design and steel construction.
- Powerbuilt 32mm Combo Wrench is good if you want something strong and cheaper than the special tool.
- Cooling fan counterhold wrench.
- BMW special tool 115030
- Fan Clutch tool by itself
- Fan Clutch Wrench and Holder tool together.
- I bought the holder tool separately because the wrench included are made from low quality metal.
 |
| Taken from Bentley Publishers E39 manual. |
Parts:
Recommended:- Fan blades Part # 11521712058.
- I bought the MTC fan and I wish I read other driver's comments before the purchase. MTC fan blades are built in China and have reported to crack in a year. Stick with OEM or Febi fan blades.
- Fan Clutch Part # 11527505302.
- Hella Behr is OEM.
- Three screws attaching fan to clutch
- Optional if original screws are in good condition
- Part # 07129905536
- Anti-seize
- Removing fan clutch in the future much easier.
- Fan shroud rivets Part # 1711712963
- In case you lose or damage them removing fan shroud.
- Penetrating oil
- PB Blaster or Kroil works wonders.
- Expansion tank cap seal Part # 17111723580
- In case of damage while removing.
- Pop open or remove rivets on both sides of fan shroud. Circled in red below.
- I used a small flat tip screw driver to pop open the rivets. A thin plastic body panel tool will work just as well.
 |
| Driver side rivet. |
 |
| Passenger/Expansion tank side. |
- Use Phillips screw driver and remove bleed screw on expansion tank. Blue dot in picture below.
- Use flat tip screwdriver or fingers and remove expansion tank cap seal. Red dots in picture below.
- Squeeze two plastic tabs together and pull seal out.

- Push expansion tank backwards out from fan shroud.

- Reinstall bleed screw.
- Place fan clutch holding tool on two water pump pulley bolts.
- Use the appropriate side of the holding tool depending on which two pulley bolts are easiest to get to.
- Place 32 mm wrench on clutch fan nut to remove clutch.
- Turn wrench clockwise while holding counterholding tool on pulley bolts to loosen fan clutch nut.
- Nut may be very hard to remove so use PB blaster or other penetrating oil on the nut. Be careful not to spill any oil onto the belts.
- A lot of force may be necessary to loosen the nut.
- Remove air intake box to get better access to water pump bolts with counter hold tool.
- If you are overhauling cooling system or changing the thermostat, removing the radiator to thermostat hose will help greatly in getting access to the water pump pulley bolts.
- I was not able to get good pictures of the clutch nut so I scanned and added Bentley manual pages below.


- One the nut is loose, spin fan blades clockwise until clutch is off water pump threads.
- Carefully hold fan and raise fan shroud.
- Other DIYs and manuals say to remove cooling hoses from the bottom and side of the fan shroud. I did not do this because I only raised the fan shroud a few inches to slide the fan and clutch out. Just be careful not to damage any of the hoses if you don't remove them.
- Slide blades and clutch fan up and away from shroud.
 |
| My original fan coated in grime. |
- Remove three screws holding blades to clutch. Red dots on picture below.
- They are 5 mm Allen/Hex screws. They have a lot of grime and may be difficult to remove. Penetrating oil will help greatly. Be careful not to strip the bolts. Part # 07129905536 if they are missing or damaged.

- Place new fan on new clutch. Ensure blades are going the right direction and not installed backwards.
- Install three 5 mm Hex screws to attach fan to clutch.
- Use new screws if original are in bad condition
 |
| I bought MTC fan blades. Do not make the same mistake. |
- Carefully raise fan shroud and insert fan into shroud.
- Screw fan clutch nut over water pump threads. Spin fan counter-clockwise to tighten nut. This may require some time and patience.
- Add anti-seize to pulley threads for easier removal in the future.
- Tighten clutch nut onto water pump. Torque figures are in the picture below.
 |
| Installed! |
 |
| Bentley manual torque figures. |
- Remove bleed screw and push expansion tank back into fan shroud.
- Reinstall expansion tank seal.
- Reinstall bleed screw.
- Ensure fan shroud is correctly seated.
- Reinstall any cooling hoses if they were removed.
- Pop in or reinstall two rivets on each side of fan shroud.
- Start E39 and observe fan clutch operation.
- There should be much more air flowing through the fan and no growling or rumbling noises. Do not put your hands or fingers in fan!
V8 equipped E39s do not need to remove fan shroud to access fan clutch nut.

Do not put your hands or fingers in the fan while the car is running. I would not try the newspaper test because the fan blades can be brittle and may shatter when inserting the newspaper. Test clutch friction and tension by trying to spin the blades while the car is off or replace the unit during cooling system overhauls. Also, if there are strange noises, cooling is weak, or fluid is leaking, change the clutch and blades.
This is a perfect time to replace the unit while changing cooling parts.
The coolant hoses may need to be removed from the fan shroud. Safely jack up E39 and put on jack stands. Remove under body tray and remove coolant hoses from fan shroud.
I have seen negative reviews for the MTC blades and I would stick to OEM or equivalent. I bought MTC blades and will be changing them out.
I noticed a significant amount of air being moved and faster fan speed with the new Hella Behr clutch. I am so glad I replaced the clutch before it failed and the fan blade shattering. Google BMW fan blade shattering or explosion and see the catastrophic damage done.
RealOEM parts diagram below.
RealOEM parts diagram below.

No comments:
Post a Comment