21 May 2016

BMW E39 5 Series Oil Fill Cap

I replaced the oil fill cap on my E39 530i because it was very difficult to twist and remove. The rubber seal had hardened into plastic and covered in sludge. The seal is bad so I did not use silicone grease on the seal to ease in removal.

The two plastic prongs over the metal tabs are missing on the original cap. I don't know if it came from the factory without the two prongs and were added to new caps or if the previous owner broke them.

I have been working on resolving the intermittent P0171 and P0174 codes as described here and have been reading various BMW forums for solutions. I came across a few posts that say a bad oil filler cap seal will cause these codes. It seems like a stretch but I needed to replace the cap anyways.

Picture of the old oil filler cap versus new.


Oil filler cap Part # 11127509328 
  • Compatible with E36, E46, E60, E53, E34, E66, E65, E70, and E85 BMW models.

DIY: BMW E39 5 Series Cabin Air Filter

How to replace cabin air microfilters on the BMW E39 5 Series (1997 - 2003)

Parts:
Recommended:
Steps:
  • Pop open hood
  • Locate two cabin filter service covers. One is located on the driver side and the other on the passenger side behind the strut towers. 

  • Unclip wire latch circled in red below. Do this on both sides. 

A screwdriver may be used if it is difficult to unclip.
  • Pull filter cover out towards you. Be careful not to damage the two rear plastic tabs. 
    • Part # 64318379627 left and part # 64318379626 right in case they need to be replaced. 
  • Remove old cabin air filters. 
Old micro filter.
    • I don't think the previous owner ever changed the filters. Look at all the dusty, mold, and crap that on the old filter. Yuck! New Mann filter looks so much better. 

  • Clean filter box by vacuuming leaves, wiping away any dirt and debris. Ensure intake and drain holes are clear. 
  • Now is good time to spray any Lysol or A/C cleaner into the air box intake to remove nasty and funky smells. 
Previous owner never cleaned the box so there is dust and debris everywhere. 
  • Install new filters by placing them in box. 
    • There are directional air flow arrows on the Mann filter which tells you which side is up. 
    • Many filters have less pleats than before and do not fit perfectly in the air box. There may be some gaps on the side and distortion. Unfortunately, I haven't found a brand that is a perfect fit. 
  • Install covers by inserting rear tabs in first
  • Reclip wire latches onto covers.
Notes: 
You want to replace the microfilters regularly to ensure pollen, dust, harmful gases, and spores are removed from the ventilation system. Spend the extra money and get the charcoal filters for optimal filtration. 

If you do not replace them, they will look as nasty as the old filters and you will be breathing all that crap. This is a 5 minute job and the filters are cheap, just do it yourself. A mechanic will charge too much to replace the filters and may not remove the debris hanging out in the box. 

The filters come in pairs.

Helpful picture below. Taken from BMW Parts manual.


Here is a Top Gear clip of Jeremy Clarkson banging on the cabin air box with a hammer. Jeremy thinks it is a fuse box and Richard and James correct him.

Why: 
Microfilters clean the air in the cabin of your BMW. A dirty and clogged microfilter means you and your passengers are breathing in that polluted air. Microfilters remove contaminants, pollen, pollutants from the air going into the cabin. This is the quickest and easiest jobs you can do and I am shocked that the previous owner never changed them. 

08 May 2016

Lean Codes P0171 & P0174 on my E39 530i

I recently purchased a E39 530i and had an emissions check done. P0174 was listed on the emission sheet but the check engine light was not on. I was able pass and register for the year.

A week later, I was pulling away from a stop at an uphill intersection and the service engine light came on. Codes P0171 and P0174 (Lean bank 1 and bank 2) showed up on my ODBII scanner. Luckily I just passed emissions so I have a year to resolve the issue. 

I have completed these steps to resolve the code, but they still show up. 
  • Clean MAF sensor
  • Replace engine air filter
  • Replace oil filler cap
  • DISA valve from previous owner is brand new
  • Clean idle control valve
  • Clean throttle body 
  • Replaced small vacuum hose attached to F-elbow on upper intake boot. It was super brittle and snapped into many pieces when I gently pulled the hose. 
    • F-Elbow Part # 13327503677
  • Inspected all the other vacuum hoses and I can't see any cracks or brittleness. 
What I have planned:
  • Replace fuel filter 
  • Replace upper intake boot. Part # 13547505838
    • I found a small crack in one of the areas that bend and meet the lower intake boot. You can barely see it and I didn't even noticed it until the third time I took of the boot. This is most likely the culprit and I hope this will clear the code. 
  • Replace Vanos oil line. There is oil leaking from the banjo bolt near the thermostat. I don't know if this contributes to the P0174 code.  
  • Replace valve cover gaskets. Could a brittle valve cover gasket result in mixture too lean? 
  • CCV: I started the 530i and removed the oil filler cap. No strange noises and there was good suction so I don't think the CCV is to blame. 
I believe the previous owner encountered this code and brought it to the dealer to have it fixed. The DISA valve and many vacuum hoses are new, and the MAF sensor was very clean and didn't have grime anywhere. None of the attempted fixes cleared the code so the owner probably got fed up (along with the other issues) and sold the 530i.

Update #1: I changed the upper intake boot  and I haven't seen the service engine light come on. I am hoping the light was intermittently showing up because of the crack in the intake boot and brittle small hose on the F-elbow.

The difference between the new and old intake boot is astonishing. The rubber on the intake boot is so soft and pliable whereas the original is hard as rock. I had some difficulty removing the F-elbow and small air box at the bottom of the boot because of the rubber aging.

Update #2: I haven't had the lean codes show a month and a half later. The culprit is the upper intake boot crack and the small hose on the F-connector. I went ahead and changed the fuel filter since it has never been changed.

Installed new small hose on F Connector

Leave a comment if you have encountered and resolved the codes on your E39. Any help is appreciated.

07 May 2016

How to Change Engine Oil on a BMW E39 530i

DIY draining and refilling engine oil on 6 cylinder E39s. May apply to other models with the M54B30 or M52 engine.


Tools:
  • 17 mm socket
  • 35/36 mm socket 
  • Ratchet(s)
  • Oil drain pan
  • Ramps or jack and jack stands
Parts:  
Recommended:
  • Any shop rag, towel, oil eater pad, kitty litter or oil absorbent to clean spills, gloves. 
  • Jack point adapter to prevent damaging jack point. 
  • Funnel
Steps: 
  • Drive BMW for a short period to warm engine oil.
  • Drive onto ramps or use a jack and jack stands to lift front end. 
    • Use jack pad adapters to prevent crushing plastic jack points. 
    • Place wheel chocks on rear wheels and set parking brake to prevent BMW from sliding.

Jack points in the Bentley Manual
  • Open hood
  • Use a 35/36 mm socket and ratchet to remove oil housing cap and filter. I use the Lisle 35/36 mm socket for its low profile and strength.
    • Place rags or pigmat around filter to soak up any oil.
    • Set the oil cap and filter aside after removing. 
Lisle socket on oil filter cap
  • Get underneath vehicle and locate oil drain plug. The plug is right behind the front jack point.
    • Your E39 may have plastic paneling or trap door that covers your oil pan, my 530i did not. I do not know if the vehicle did not come with the panels or the previous owner removed them. 
Oil drain plug highlighted in red.
  • Use 17 mm socket and remove drain plug. 
    • Place oil drain pan where you think the oil will come out. The plug is not facing downwards so oil will shoot out towards the passenger side. I use my Lisle Black Pan for its large capacity and spout.  
    • Do not use an impact wrench to remove or install plug. 
  • Remove the old filter from cap while the oil is draining.
    • Pull filter straight out. This may require moderate force. 
  • Replace large o-ring on oil filter cap. 
    • Use a scribe or small flat head screw drive to remove old o-ring. Be careful not to damage oil filter cap.
    • Check condition of two small o-rings and replace if necessary. Part # 11421744001
    • Coat new o-ring with new oil and install. Please note proper location of O-ring by referencing picture below. 
  • Install oil filter and filter cap. 
    • Use 35/36 mm socket and torque to 18 ft-lbs
    • Optional: Install filter cap after inserting oil drain plug. I put one quart of oil into the oil filter housing and the rest into the engine.
  • Place new copper gasket on drain plug and install using 17 mm socket. 
    • Torque to 25 ft-lbs. 
    • I installed a MTC magnetic drain plug because the original plug was complete rusted and the previous owner rounded the plug head. 
    • Reinstall any body paneling or trap doors if equipped. 
MTC magnetic plug
MTC magnetic plug installed
  • Remove wheel chocks
  • Carefully lower BMW by driving off ramps or jacking and removing jack stands. 
  • Remove oil cap and fill with 6.5 liters or 6.7 quarts. 
    • Use dipstick to check if oil is within limits, add more if necessary. 
    • Use a funnel to prevent spills. I use the Hopkins funnel and it works fine.
Oil filler cap location and locking funnel.
  • Reinstall oil cap. 
  • Close hood and take a 10-15 minute drive. Check if there are any leaks. 
Notes: 
I used Mobil 1 because of their 5 quart rebates. Amazon and Walmart sell their 5 quarts for $23 and with the $12 rebate it only costs $11. 


30 April 2016

How to Change Spark Plugs on a BMW E39 530i

DIY: Spark plugs on BMW E39s equipped with M54 inline six engines. May apply to M52 engines and E46s.
BMW recommends the spark plugs be changed every 100,000 miles which seems a bit high. Many drivers suggest 60,000 - 80,000 miles.

Tools:
  • Various flat tip screwdrivers
  • 10 mm socket
  • Ratchets and extensions
  • 5/8" Spark plug socket
  • Torque wrench
Parts:
Recommended:
  • Dielectric grease for coil harness connectors
Steps: 
  • Open hood
  • Remove passenger side cabin filter hose. 
    • Optional. Will make this job much easier if removed. 
    • Use a flat tip screw driver and detach three clips.
    • Pull and remove hose from micro filter cabin box.
    • Twist and pull hose out from opening. See picture below.
Rubber O-ring that fits over the hole came off with the hose. Not sure if that is supposed to happen but it is easy to reinstall.
Hose completely removed.
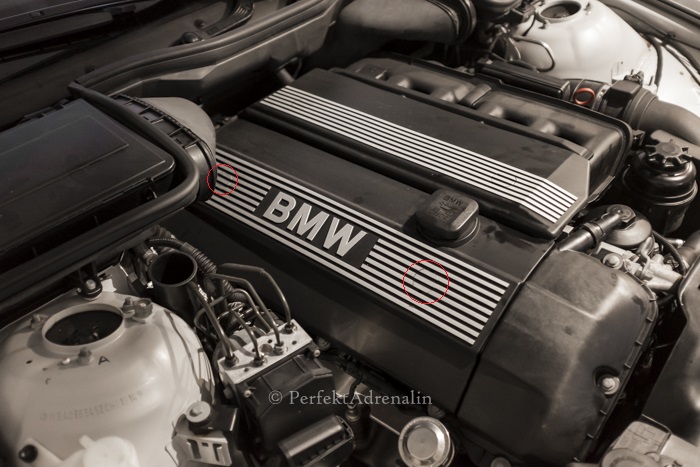
  • Use a flat tip screwdriver and pop out two small circular covers. See red circles below.
  • Use 10 mm socket and remove two nuts holding engine cover. Picture of 10 mm nut below.

  • Remove oil fill cap.
  • Remove engine cover.
  • Reinstall oil fill cap to ensure nothing falls into engine.
  • Use flat tip screwdriver and raise metal clips on each coil. 
  • Unplug female connector to each coil 
  • Use 10 mm socket and remove two 10 mm bolts holding each coil. 
    • Coil #1 and #6 have wires attached to them. Note their position for reinstallation. 
#6 Coil. Note the wire on the left.
  • Remove each coil by pulling them out.
    • Mark each coil to which cylinder they belong to or arrange them in order so they go back to the same spot on installation.
  • Use 5/8" spark plug socket and extension to remove spark plugs.
Original BMW NGK Spark Plugs removed.
  • Install new spark plugs with 5/8" socket and be careful not to cross thread. 
    • NGK plugs are coated with a metal jacket and do not need anti-seize.
    • The Bentley manual says to torque spark plugs to 18 lb-fts.
    • Various sources and NGK list the torque values around 20 - 25 lb-fts. 
  • Reinstall coils 
    • Install two 10 mm bolts to each coil
    • Apply dielectric grease (optional) to female connector and plug into coil
    • Press down on metal clips that lock connectors to each coil. 
  • Reinstall cabin air filter hose (if removed) 
    • Insert end into body of car and twist
    • Reinstall other end to filter box and pull towards box so the three clips snap into place
  • Remove oil fill cap
  • Reinstall engine cover and two 10 mm bolts securing cover
  • Reinstall oil fill cap
  • Reattach 2 small round clips over 10 mm engine cover bolts. 
Notes: 

It is a good idea to change any coils that are bad at the same time.
Check the plugs to see if there is any fouling or wet oil and gasoline on them
If you have a valve cover gasket leak, this would be a good time to change the gasket.
Changing the old spark plugs may clear any misfires or poor fuel economy and smooth the idle.
NGK says to not use anti-seize because there is a risk of over torque and it is not needed because their threads are coated. It is up to you to decide if you believe NGK and to use or not use anti-seize.

Carpro Iron X on BMW E39 530i Wheel

Carpro's Iron X is an iron remover that can be applied to all car surfaces. Iron X neutralizes the iron and bleeds purple to show that it is working.

I tested Iron X on my BMW E39 530i with wheel style 82. Iron X worked immediately and was really cool to look at.


I let Iron X sit for a few minutes and scrubbed with the Omega Speed Master Wheel Brush.
Cleaning the brake dust and grime seemed way too easy with Iron X. In the past, I had to scrub a lot more using regular wheel cleaner and degreaser. I hosed off left over Iron X and was amazed at how clean my wheel looked. Check out the picture below.


I am impressed, nothing has cleaned the BMW brake dust off so quickly. I will use Iron X once a month or maybe longer since it does a really good job and regular wheel cleaner should be able to maintain regular washes.

Carpro works on paint so it will be great to remove all the tiny rust specks after winter.

Wheel style 82s have the part # 36116751762. 


Brass Bleeder Screw for BMW E39s

I purchased the FGT Motorsport brass bleeder screws as a preventative measure and replaced the OEM plastic screws on the thermostat and expansion tank. The FGT screw comes with a rubber seal and the larger slots make it difficult to strip out with a screwdriver.

I read horror stories of drivers being stranded due to their plastic screws warping, leaking, becoming brittle over and time and eventually failing. Being stranded over a plastic screw seems easily avoidable so I spend $24 for two screws for some peace of mind.

Some BMW drivers swear by OEM plastic screws and carry a couple as backup in case they fail. The Dorman Bleeder Screws are a good aftermarket replacement if you are concerned about stripping the plastic threads with the brass screw.

OEM Part# 1711171278, 11537793373

Brass screw is compatible with E46, E36, E30, E38, E39, Mini Coopers, and E83 BMW models. 

Plastic or brass, do not over tighten bleeder screws.

Looking good.


How to Change Engine Air Filter on BMW E39 530i

DIY: Change Engine Air Filter on E39 530i and 525i. May be applicable to E46s.

Parts: 
Steps: 
  • Open hood
  • Locate air filter box on the driver's side and right behind the headlamps
  • Unlatch two clips (red circles)
Location of other clip closest to driver.
  • Pull air filter tray upwards.
  • Remove any leaves or debris in air box.
Leaves love to hide in here
  • Remove old filter from tray and install new filter. 
    • The previous owner used a Napa filter which is a lot thinner than the new Mann filter on the right. 
  • Install air filter tray inside air box until the two clips latch into place. 
Notes: 
One my clips would not unlatch so I had to forcefully pull the tray out. Yours may or may not require the same technique.

Please change your engine air filter yourself. The job is very quick and easy. Do not overpay at quick lube places or the dealerships.

Inspect air filter every oil change or 10-15,000 miles. Replace as necessary.

Clean air filter results in better MPG and engine performance. Do not let a clogged air filter cost you money at the pump.